Apache Flink
Apache Flink is a stream processing engine. With Apache Flink Open Engines, you can read data from an event-stream source (eg. Kafka) and perform stateful computations such as tracking user sessions with windows. Flink can also create and write to Onehouse tables.
Initially, Open Engines support Flink application JARs (Java and Scala code). In the future, we plan to add support for the Flink SQL Gateway and PyFlink.
By default, Onehouse uses uses Apache Flink version 1.17. You may change this to any other Apache Flink version in your Custom Resource (described below), though we suggest using version 1.17 or later for full compatibility with the Onehouse product.
Connect to a Catalog
Apache Flink Clusters connect to an external Hive Metastore or DataProc catalog that provides the schemas of the tables you can read from and syncs any tables you create or update. You will select this catalog during Cluster creation.
Submit Apache Flink Applications
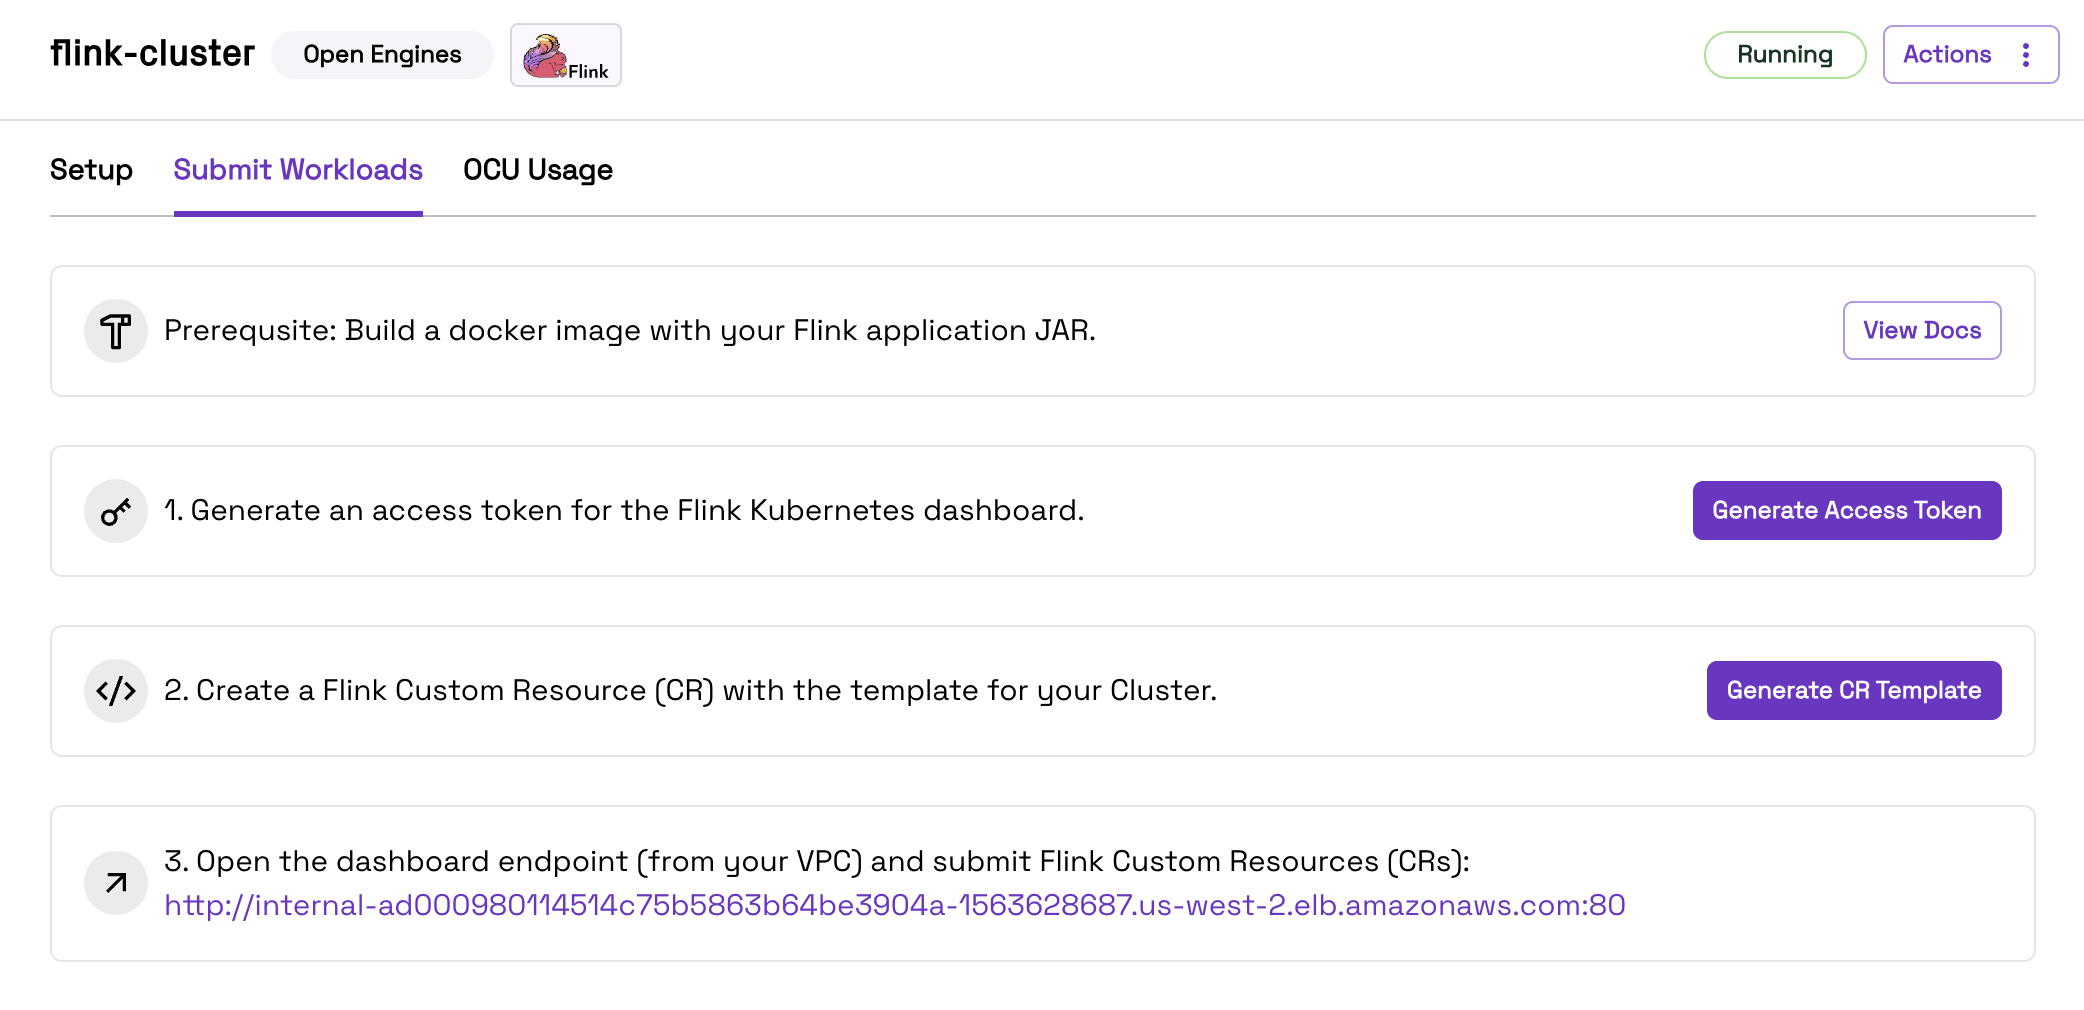
You can submit Apache Flink applications and actions as Custom Resources (CRs) to your Apache Flink Open Engines Cluster. Follow the steps in the Onehouse console to submit your CRs.
- Build Docker Image: Build a docker image (using a Flink stable image as base) including the Flink application JAR. This image must be built for the
linux/amd64platform (see docs). Push the image to a remote container registry accessible from your VPC. For private docker registries, follow the steps in the section below. - Generate Access Token: Generate an access token for the Kubernetes dashboard from the Onehouse console. This token will be active for 8 hours, after which you must generate a new token. Flink applications will continue running after the token expires.
- Custom Resource (CR) Template: Onehouse will auto-generate a Flink Custom Resource template for your Cluster based on its configurations. Fill in the variables in the template, such as the application name, JAR URI, and the docker image you created (in
spec.image). - Submit CR in the Kubernetes Dashboard: Open the Kubernetes dashboard link from the Onehouse console (you must be connected to your VPC). On this page, you can submit a CR to start or stop a Flink application, upgrade an application, create a snapshot, and more.
Monitor Apache Flink Applications
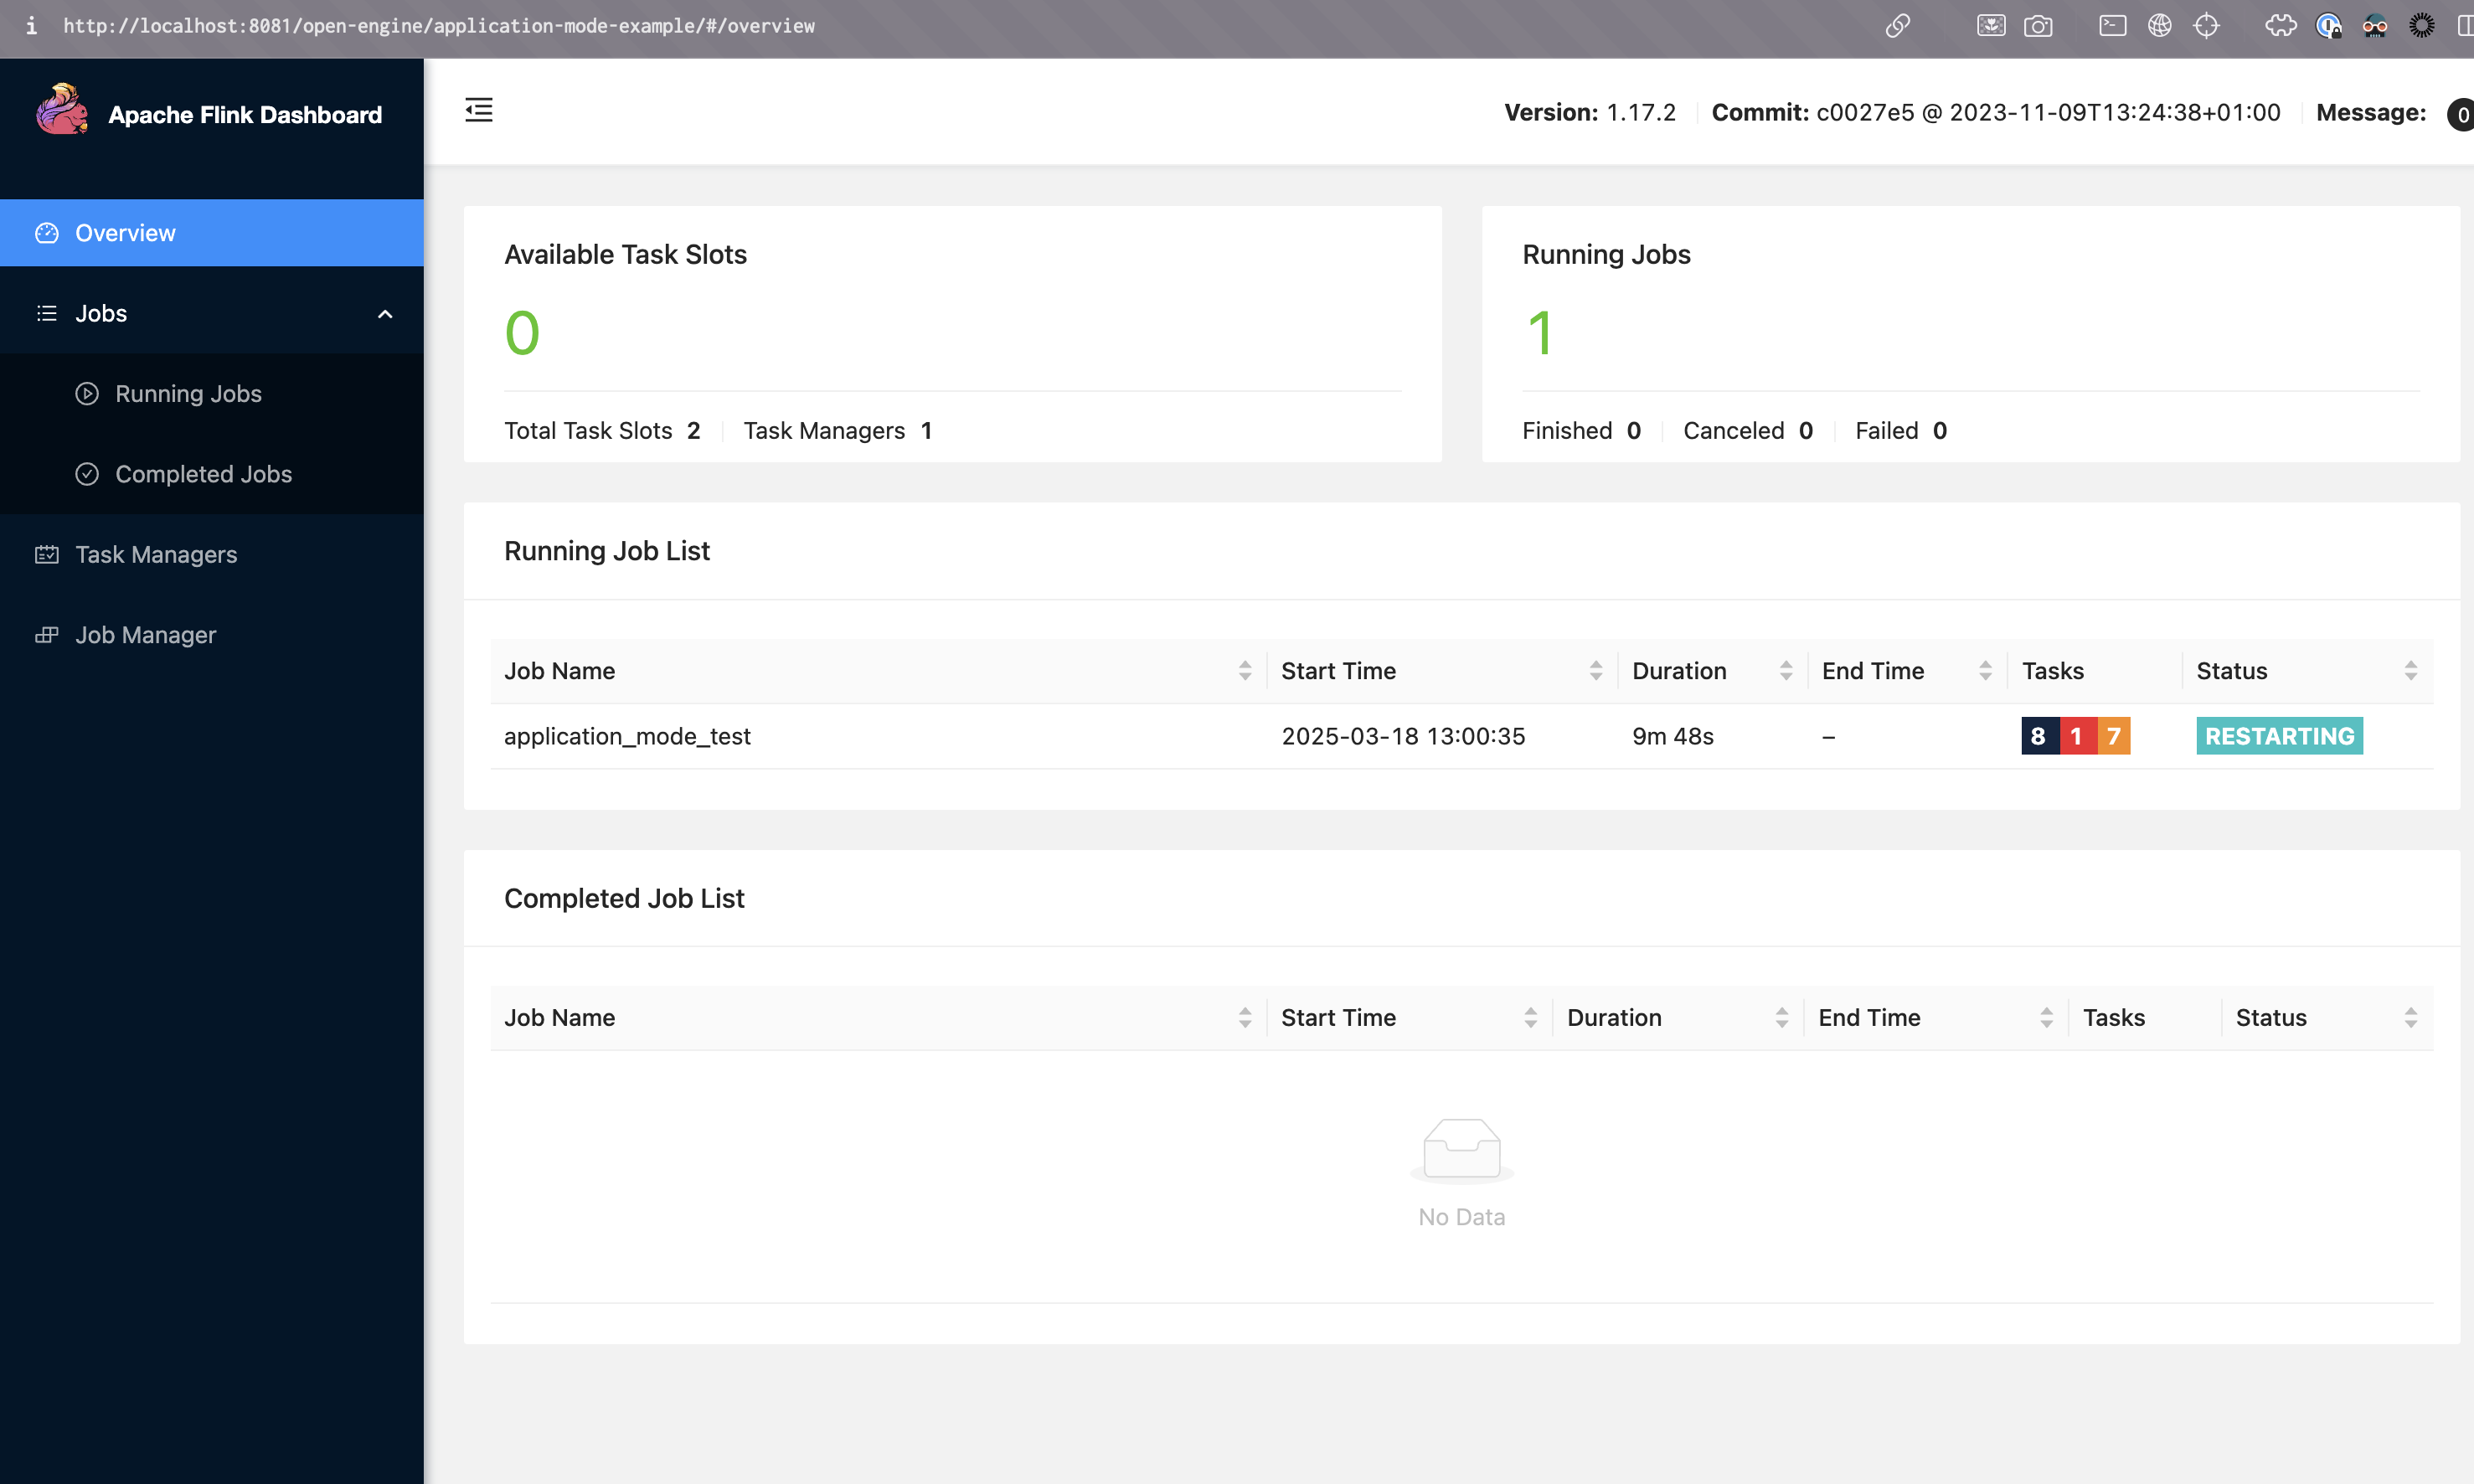
You can monitor your Flink applications in the Flink Web UI. Open the Kubernetes Dashboard (as explained in the previous section) and navigate to the Ingresses page. Navigate to the ingress associated with your Flink deployment, then find the path in the rules section.
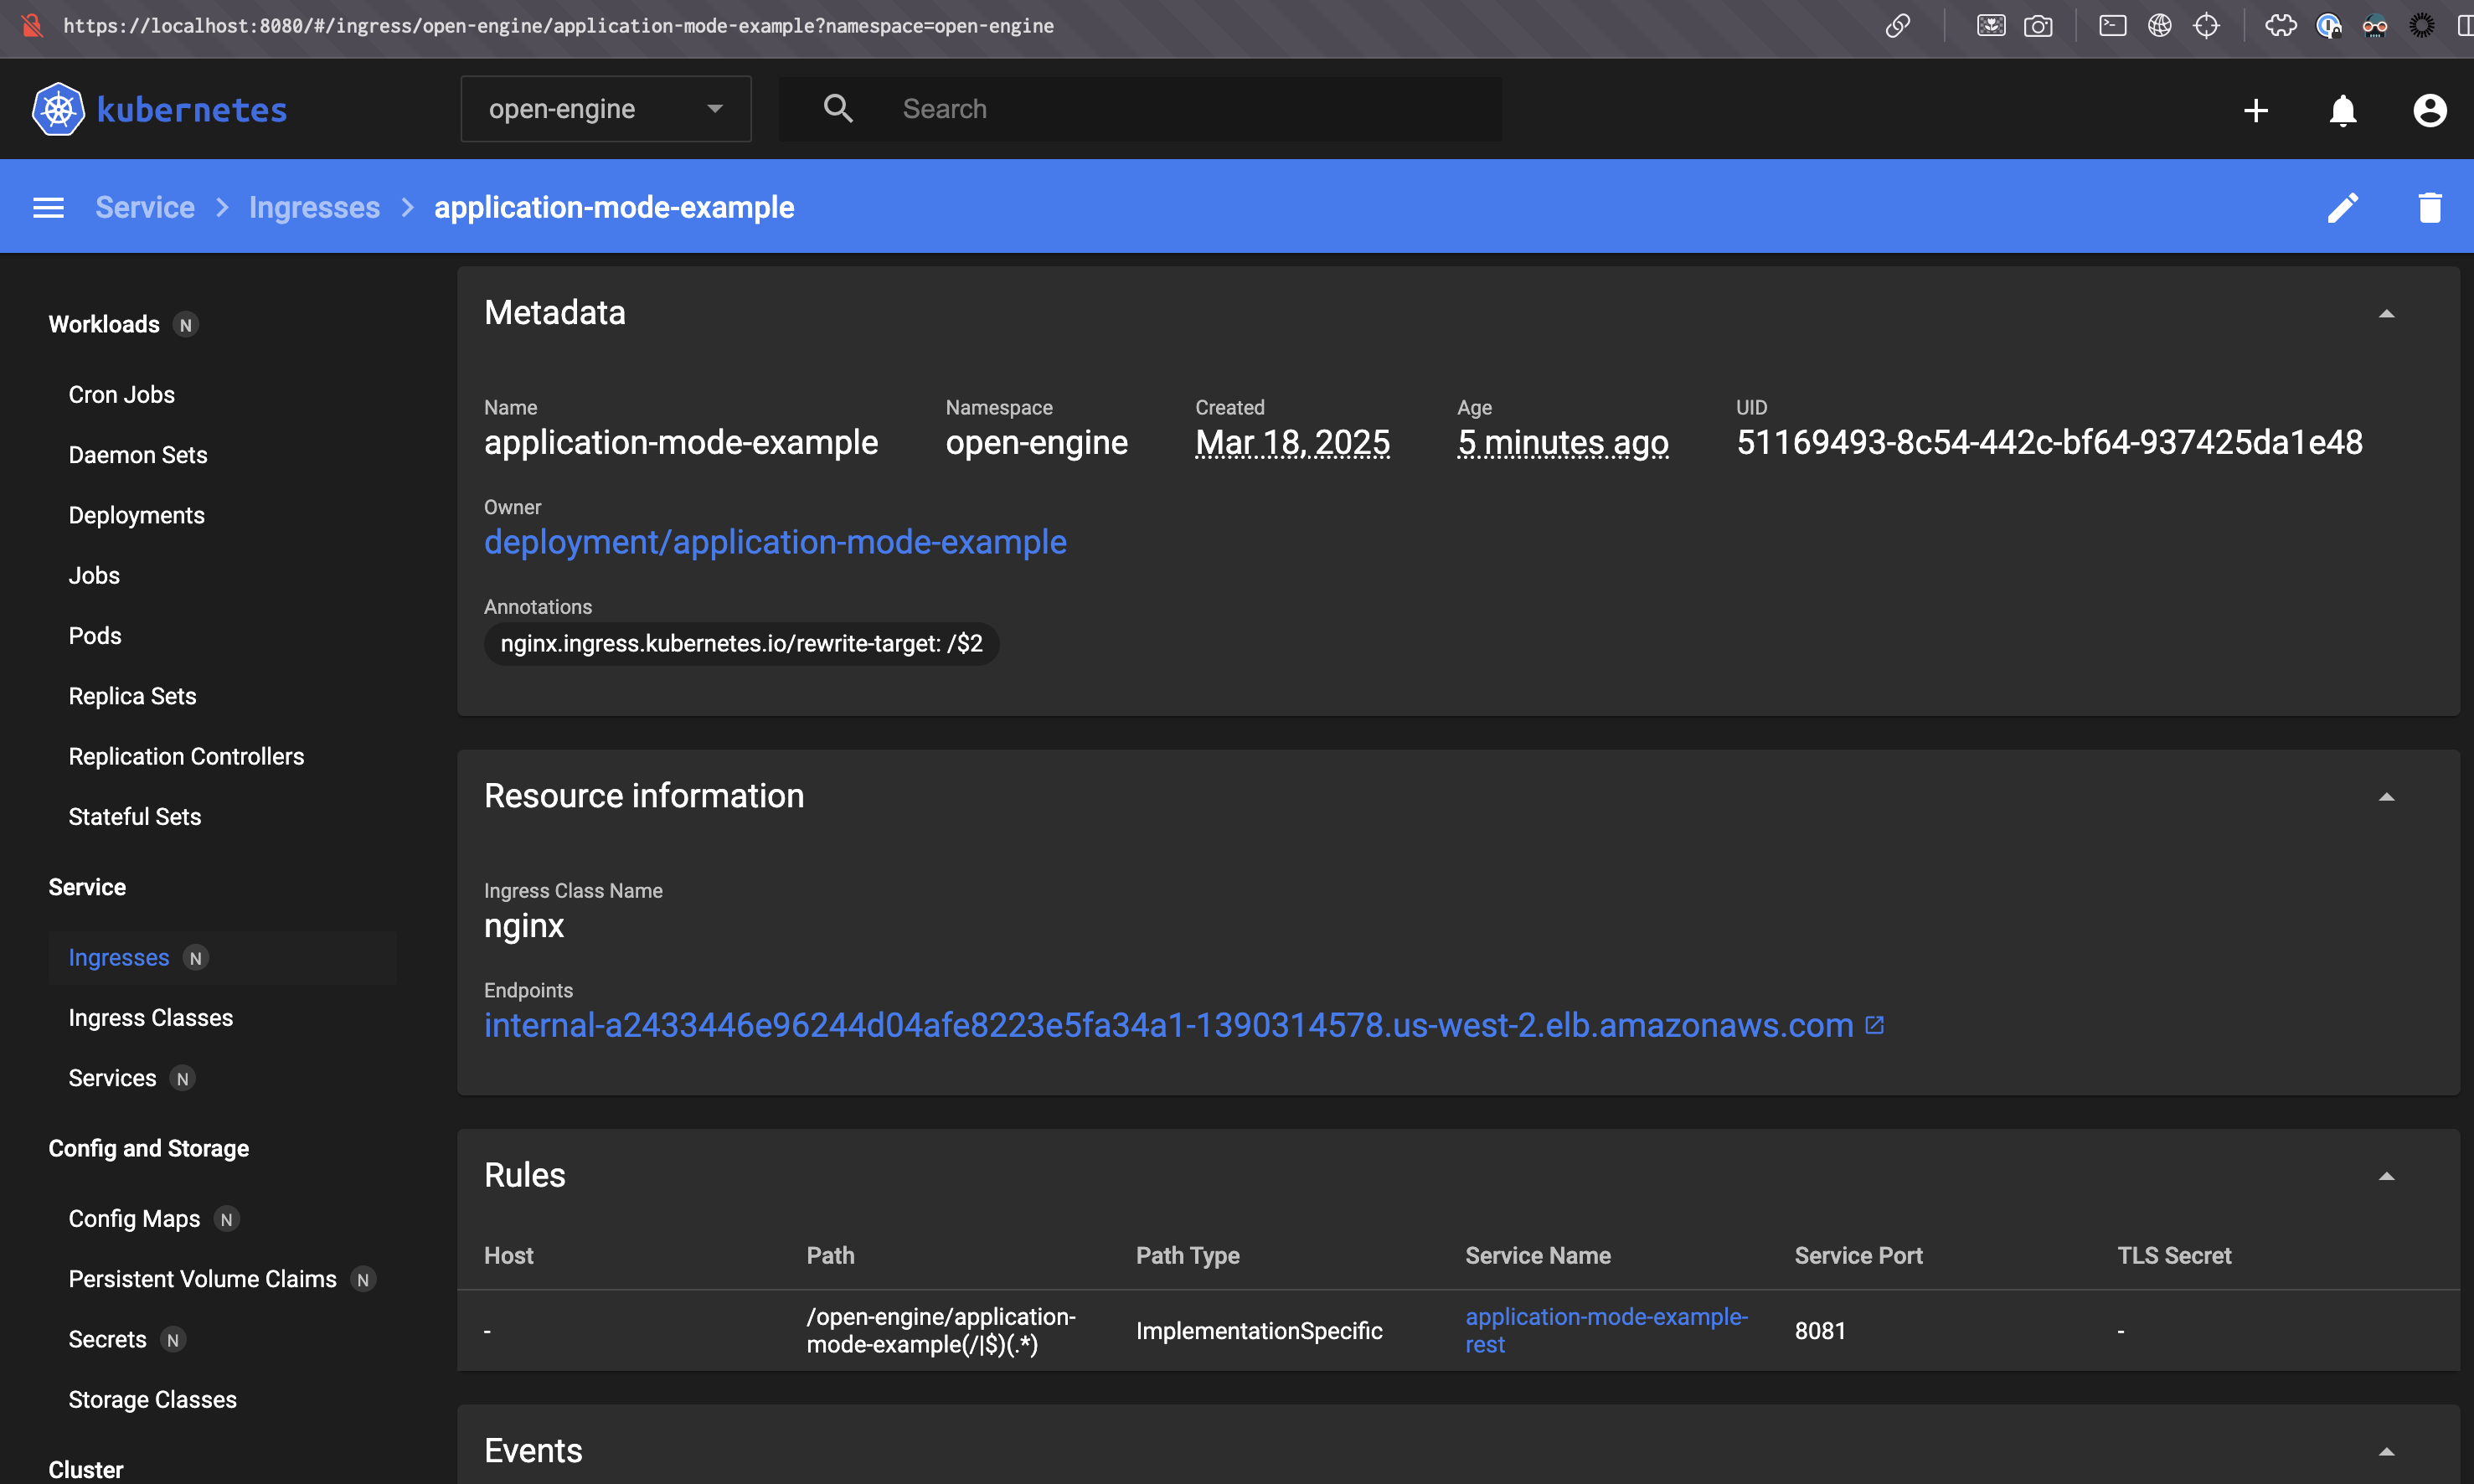
In this example, after portforwarding nginx lb port 80 to localhost 8080, the UI can be accessed at http://localhost:8080/open-engine/application-mode-example/ (the url must end with '/').
Private Docker Registries
If you are using private docker registries, you must create a secret in the Flink namespace with auth credentials, by following these steps:
- Generate a
base64-encoded-docker-config:
echo -n '{"auths":{"REGISTRY_URL":{"username":"USERNAME","password":"PASSWORD","email":"your-email@example.com","auth":"BASE64(username:PASSWORD)"}}}' | base64 -w 0
- Create the secret using the Kubernetes dashboard:
apiVersion: v1
kind: Secret
metadata:
  name: my-registry-secret
  namespace: openengine-flink
type: kubernetes.io/dockerconfigjson
data:
  .dockerconfigjson: <base64-encoded-docker-config>
You will reference this secret later in your flinkDeployment.yaml.
Note that these secrets will be visible to the Onehouse support team. For additional security you may create read-only credentials with limited permissions.
Write Data with Apache Flink
Onehouse can detect and optimize tables written by Flink in the Apache Hudi format.
Important Requirements for Writing with Apache Flink
- Tables created by Open Engines can only be viewed and managed by Onehouse in the Apache Hudi format, and must be created as External Tables under an Observed Lake. We soon plan to add support for tables created in Managed Lakes.
- Open Engines do not yet integrate with lock providers in Onehouse. You must add your lock provider configurations manually for the Open Engines writer when writing concurrently to a table other Onehouse writers such as Stream Captures or Table Services. We plan to integrate with Onehouse lock providers soon.
Additional Apache Flink Usage Notes
- Queueing Applications: If the Cluster does not have available resources to pick up a new Flink application, the new application will be queued.
- Package Management: You should include all dependencies in the application JAR. We suggest including the following libraries:
- Apache Hudi (install
hudi-flink<flink-version-number>-bundle/) - Apache Kafka
- Any relevant serializer and Schema Registry libraries
- Apache Hudi (install
- Deployment Mode: Onehouse deploys Flink Clusters in application mode.
Example: Run an Apache Flink application
We will run through the following steps to run an Apache Flink application:
- Write Application Code
- Compile a JAR
- Build a Docker Image
- Generate an Access Token
- Create Custom Resource (CR) Template
- Submit CR in the Kubernetes Dashboard
Start by creating the following files with your application code and package details. You will use these to create your application JAR.
src/main/java/flink/flinkTest/HudiQuickStart.java
  package org.flinkTest;

  import org.apache.flink.streaming.api.CheckpointingMode;
  import org.apache.flink.streaming.api.datastream.DataStreamSource;
  import org.apache.flink.streaming.api.environment.CheckpointConfig;
  import org.apache.flink.streaming.api.environment.StreamExecutionEnvironment;
  import org.apache.flink.streaming.api.functions.source.SourceFunction;
  import org.apache.flink.table.api.DataTypes;
  import org.apache.flink.table.data.RowData;
  import org.apache.flink.table.data.StringData;
  import org.apache.flink.table.data.TimestampData;
  import org.apache.flink.table.data.binary.BinaryRowData;
  import org.apache.flink.table.data.writer.BinaryRowWriter;
  import org.apache.flink.table.data.writer.BinaryWriter;
  import org.apache.flink.table.runtime.typeutils.InternalSerializers;
  import org.apache.flink.table.types.DataType;
  import org.apache.flink.table.types.logical.RowType;
  import org.apache.flink.types.RowKind;
  import org.apache.hudi.common.model.HoodieTableType;
  import org.apache.hudi.configuration.FlinkOptions;
  import org.apache.flink.table.types.logical.LogicalType;
  import org.apache.hudi.util.HoodiePipeline;

  import java.util.Arrays;
  import java.util.HashMap;
  import java.util.List;
  import java.util.Map;
  import java.util.UUID;
  import java.util.concurrent.TimeUnit;

  public class HudiQuickStart {

      public static void main(String[] args) throws Exception {
          if (args.length < 2) {
              System.err.println("Usage: HudiQuickStart <targetTable> <basePath>");
              System.exit(1);
          }

          String targetTable = args[0];
          String basePath = args[1];

          StreamExecutionEnvironment env = StreamExecutionEnvironment.getExecutionEnvironment();

          Map<String, String> options = createHudiOptions(basePath);

          DataStreamSource<RowData> dataStream = env.addSource(new SampleDataSource());
          HoodiePipeline.Builder builder = createHudiPipeline(targetTable, options);

          builder.sink(dataStream, false);
          env.execute("Api_Sink");
      }

      private static void configureCheckpointing(StreamExecutionEnvironment env) {
          env.enableCheckpointing(5000);
          CheckpointConfig checkpointConfig = env.getCheckpointConfig();
          checkpointConfig.setCheckpointingMode(CheckpointingMode.EXACTLY_ONCE);
          checkpointConfig.setMinPauseBetweenCheckpoints(10000);
          checkpointConfig.setCheckpointTimeout(60000);
          checkpointConfig.setCheckpointStorage("file:///tmp/hudi_flink_checkpoint_1");
      }

      private static Map<String, String> createHudiOptions(String basePath) {
          Map<String, String> options = new HashMap<>();
          options.put(FlinkOptions.PATH.key(), basePath);
          options.put(FlinkOptions.TABLE_TYPE.key(), HoodieTableType.MERGE_ON_READ.name());
          options.put(FlinkOptions.PRECOMBINE_FIELD.key(), "ts");
          options.put(FlinkOptions.RECORD_KEY_FIELD.key(), "uuid");
          options.put(FlinkOptions.IGNORE_FAILED.key(), "true");
          return options;
      }

      private static HoodiePipeline.Builder createHudiPipeline(String targetTable, Map<String, String> options) {
          return HoodiePipeline.builder(targetTable)
                  .column("ts TIMESTAMP(3)")
                  .column("uuid VARCHAR(40)")
                  .column("rider VARCHAR(20)")
                  .column("driver VARCHAR(20)")
                  .column("fare DOUBLE")
                  .column("city VARCHAR(20)")
                  .pk("uuid")
                  .partition("city")
                  .options(options);
      }

      static class SampleDataSource implements SourceFunction<RowData> {
          private volatile boolean isRunning = true;
          public static BinaryRowData insertRow(Object... fields) {

              DataType ROW_DATA_TYPE = DataTypes.ROW(
                              DataTypes.FIELD("ts", DataTypes.TIMESTAMP(3)), // precombine field
                              DataTypes.FIELD("uuid", DataTypes.VARCHAR(40)),// record key
                              DataTypes.FIELD("rider", DataTypes.VARCHAR(20)),
                              DataTypes.FIELD("driver", DataTypes.VARCHAR(20)),
                              DataTypes.FIELD("fare", DataTypes.DOUBLE()),
                              DataTypes.FIELD("city", DataTypes.VARCHAR(20)))
                      .notNull();
              RowType ROW_TYPE = (RowType) ROW_DATA_TYPE.getLogicalType();
              LogicalType[] types = ROW_TYPE.getFields().stream().map(RowType.RowField::getType)
                      .toArray(LogicalType[]::new);
              BinaryRowData row = new BinaryRowData(fields.length);
              BinaryRowWriter writer = new BinaryRowWriter(row);
              writer.reset();
              for (int i = 0; i < fields.length; i++) {
                  Object field = fields[i];
                  if (field == null) {
                      writer.setNullAt(i);
                  } else {
                      BinaryWriter.write(writer, i, field, types[i], InternalSerializers.create(types[i]));
                  }
              }
              writer.complete();
              return row;
          }

          @Override
          public void run(SourceContext<RowData> ctx) throws Exception {
              int batchNum = 0;
              while (isRunning) {
                  batchNum ++;
                  // For Every Batch, it adds two new rows with RANDOM uuid and updates the row with uuid "334e26e9-8355-45cc-97c6-c31daf0df330"
                  List<RowData> DATA_SET_INSERT = Arrays.asList(
                          insertRow(TimestampData.fromEpochMillis(1695159649),
                                  StringData.fromString(UUID.randomUUID().toString()), StringData.fromString("rider-A"),
                                  StringData.fromString("driver-K"), 19.10, StringData.fromString("san_francisco")),
                          insertRow(TimestampData.fromEpochMillis(1695159649),
                                  StringData.fromString(UUID.randomUUID().toString()), StringData.fromString("rider-B"),
                                  StringData.fromString("driver-M"), 27.70, StringData.fromString("san_francisco")),
                          insertRow(TimestampData.fromEpochMillis(1695159649),
                                  StringData.fromString("334e26e9-8355-45cc-97c6-c31daf0df330"), StringData.fromString("rider-C"),
                                  StringData.fromString("driver-L"), 33.90, StringData.fromString("san_francisco"))
                  );
                  if(batchNum < 11) {
                      // For first 10 batches, inserting 3 records. 2 with random id (INSERTS) and 1 with hardcoded UUID(UPDATE)
                      for (RowData row : DATA_SET_INSERT) {
                          ctx.collect(row);
                      }
                  }else{
                      // For 11th Batch, inserting only one record with row kind delete.
                      RowData rowToBeDeleted = DATA_SET_INSERT.get(2);
                      rowToBeDeleted.setRowKind(RowKind.DELETE);
                      ctx.collect(rowToBeDeleted);
                      // Stop the stream once deleted
                      isRunning = false;
                  }
                  TimeUnit.MILLISECONDS.sleep(10000); // Simulate a delay
              }
          }

          @Override
          public void cancel() {
              isRunning = false;
          }
      }
  }
build.gradle
  plugins {
      id("java")
      id("application")
      id("com.github.johnrengelman.shadow") version "8.1.1"
  }

  repositories {
      mavenCentral()
      maven { url 'https://packages.confluent.io/maven/' }
      maven { url "https://repo.osgeo.org/repository/release/" }
      maven { url "https://nexus.pentaho.org/content/groups/omni/" }
      maven {
          url 'https://repository.apache.org/content/repositories/snapshots/'
          mavenContent { snapshotsOnly() }
      }
  }

  ext {
      flinkVersion = '1.17.2'
      flinkBinaryVersion = '1.17'
      hudiVersion = '0.14.0'
      log4jVersion = '2.17.1'
  }

  sourceCompatibility = 1.8
  targetCompatibility = 1.8

  dependencies {
      // Hudi dependency
      implementation "org.apache.hudi:hudi-flink${flinkBinaryVersion}-bundle:${hudiVersion}"

      // Apache Flink dependencies
      implementation "org.apache.flink:flink-streaming-java:${flinkVersion}"
      implementation "org.apache.flink:flink-clients:${flinkVersion}"
      implementation "org.apache.flink:flink-connector-kafka:${flinkVersion}"
      implementation "org.apache.flink:flink-table-common:${flinkVersion}"
      implementation "org.apache.flink:flink-table-runtime:${flinkVersion}"

      // Schema Registry dependencies
      implementation "io.confluent:kafka-schema-registry-client:7.4.0"
      implementation "io.confluent:kafka-avro-serializer:7.4.0"
      implementation "org.apache.avro:avro:1.11.1"
      implementation "org.apache.flink:flink-avro:${flinkVersion}"
      implementation "org.apache.flink:flink-avro-confluent-registry:${flinkVersion}"

      // Log4j dependencies (runtime only)
      runtimeOnly "org.apache.logging.log4j:log4j-slf4j-impl:${log4jVersion}"
      runtimeOnly "org.apache.logging.log4j:log4j-api:${log4jVersion}"
      runtimeOnly "org.apache.logging.log4j:log4j-core:${log4jVersion}"

      // Hadoop dependencies (provided)
      compileOnly "org.apache.hadoop:hadoop-hdfs:3.1.4"
      compileOnly "org.apache.hadoop:hadoop-common:3.1.4"
  }

  application {
      mainClass.set("FlinkHudiJob")
  }

  tasks.shadowJar {
      zip64 = true
  }

  tasks.jar {
      manifest { attributes["Main-Class"] = "FlinkHudiJob" }
  }
gradle/wrapper/gradle-wrapper.properties
  distributionBase=GRADLE_USER_HOME
  distributionPath=wrapper/dists
  distributionUrl=https\://services.gradle.org/distributions/gradle-8.3-bin.zip
  networkTimeout=10000
  validateDistributionUrl=true
  zipStoreBase=GRADLE_USER_HOME
  zipStorePath=wrapper/dists
Run the following command to compile your application code and dependencies into a JAR:
./gradlew shadowJar
Next, write a dockerfile that will create a Flink docker image from your application JAR. Ensure that you set the right Flink version, enable S3 or GCS plugins, and configure any necessary hadoop libraries. Below is an example dockerfile:
  FROM flink:1.17

  # enable filesystem plugins
  RUN mkdir -p /opt/flink/plugins/s3-fs-hadoop
  RUN cp /opt/flink/opt/flink-s3-fs-hadoop-1.17.2.jar /opt/flink/plugins/s3-fs-hadoop/

  RUN mkdir -p /opt/flink/plugins/gs-fs-hadoop
  RUN cp /opt/flink/opt/flink-gs-fs-hadoop-1.17.2.jar /opt/flink/plugins/gs-fs-hadoop/

  # Copy the Flink application JAR into the container
  COPY <relative-path-of-flink-application-jar-file> /opt/flink/lib/

  WORKDIR /opt/flink/lib/

  RUN apt-get update && apt-get install -y curl && \
      # Hadoop and FS Compatibility
      curl -O https://repo1.maven.org/maven2/org/apache/flink/flink-hadoop-compatibility_2.12/1.17.2/flink-hadoop-compatibility_2.12-1.17.2.pom && \
      curl -O https://repo1.maven.org/maven2/org/apache/flink/flink-s3-fs-hadoop/1.17.0/flink-s3-fs-hadoop-1.17.0.jar && \
      curl -O https://repo1.maven.org/maven2/org/apache/hadoop/hadoop-mapreduce-client-core/3.4.1/hadoop-mapreduce-client-core-3.4.1.jar && \
      curl -O https://repo1.maven.org/maven2/org/apache/flink/flink-gs-fs-hadoop/1.17.2/flink-gs-fs-hadoop-1.17.2.jar && \
      curl -O https://repo.maven.apache.org/maven2/org/apache/flink/flink-sql-connector-hive-2.3.9_2.12/1.17.2/flink-sql-connector-hive-2.3.9_2.12-1.17.2.jar && \
      curl -O https://repo1.maven.org/maven2/javax/servlet/javax.servlet-api/3.1.0/javax.servlet-api-3.1.0.jar
Build a docker image including your Apache Flink application JAR. Note that the image must run on Linux machines. If you are in a non-Linux environment (such as Mac or Windows), build the image using docker buildx:
docker buildx build --platform linux/arm64 -t custom-flink:latest -f <dockerfile-name> <path-to-docker-file>
Push the docker image to a remote container registry. You will reference the image soon in your Kubernetes Custom Resource.
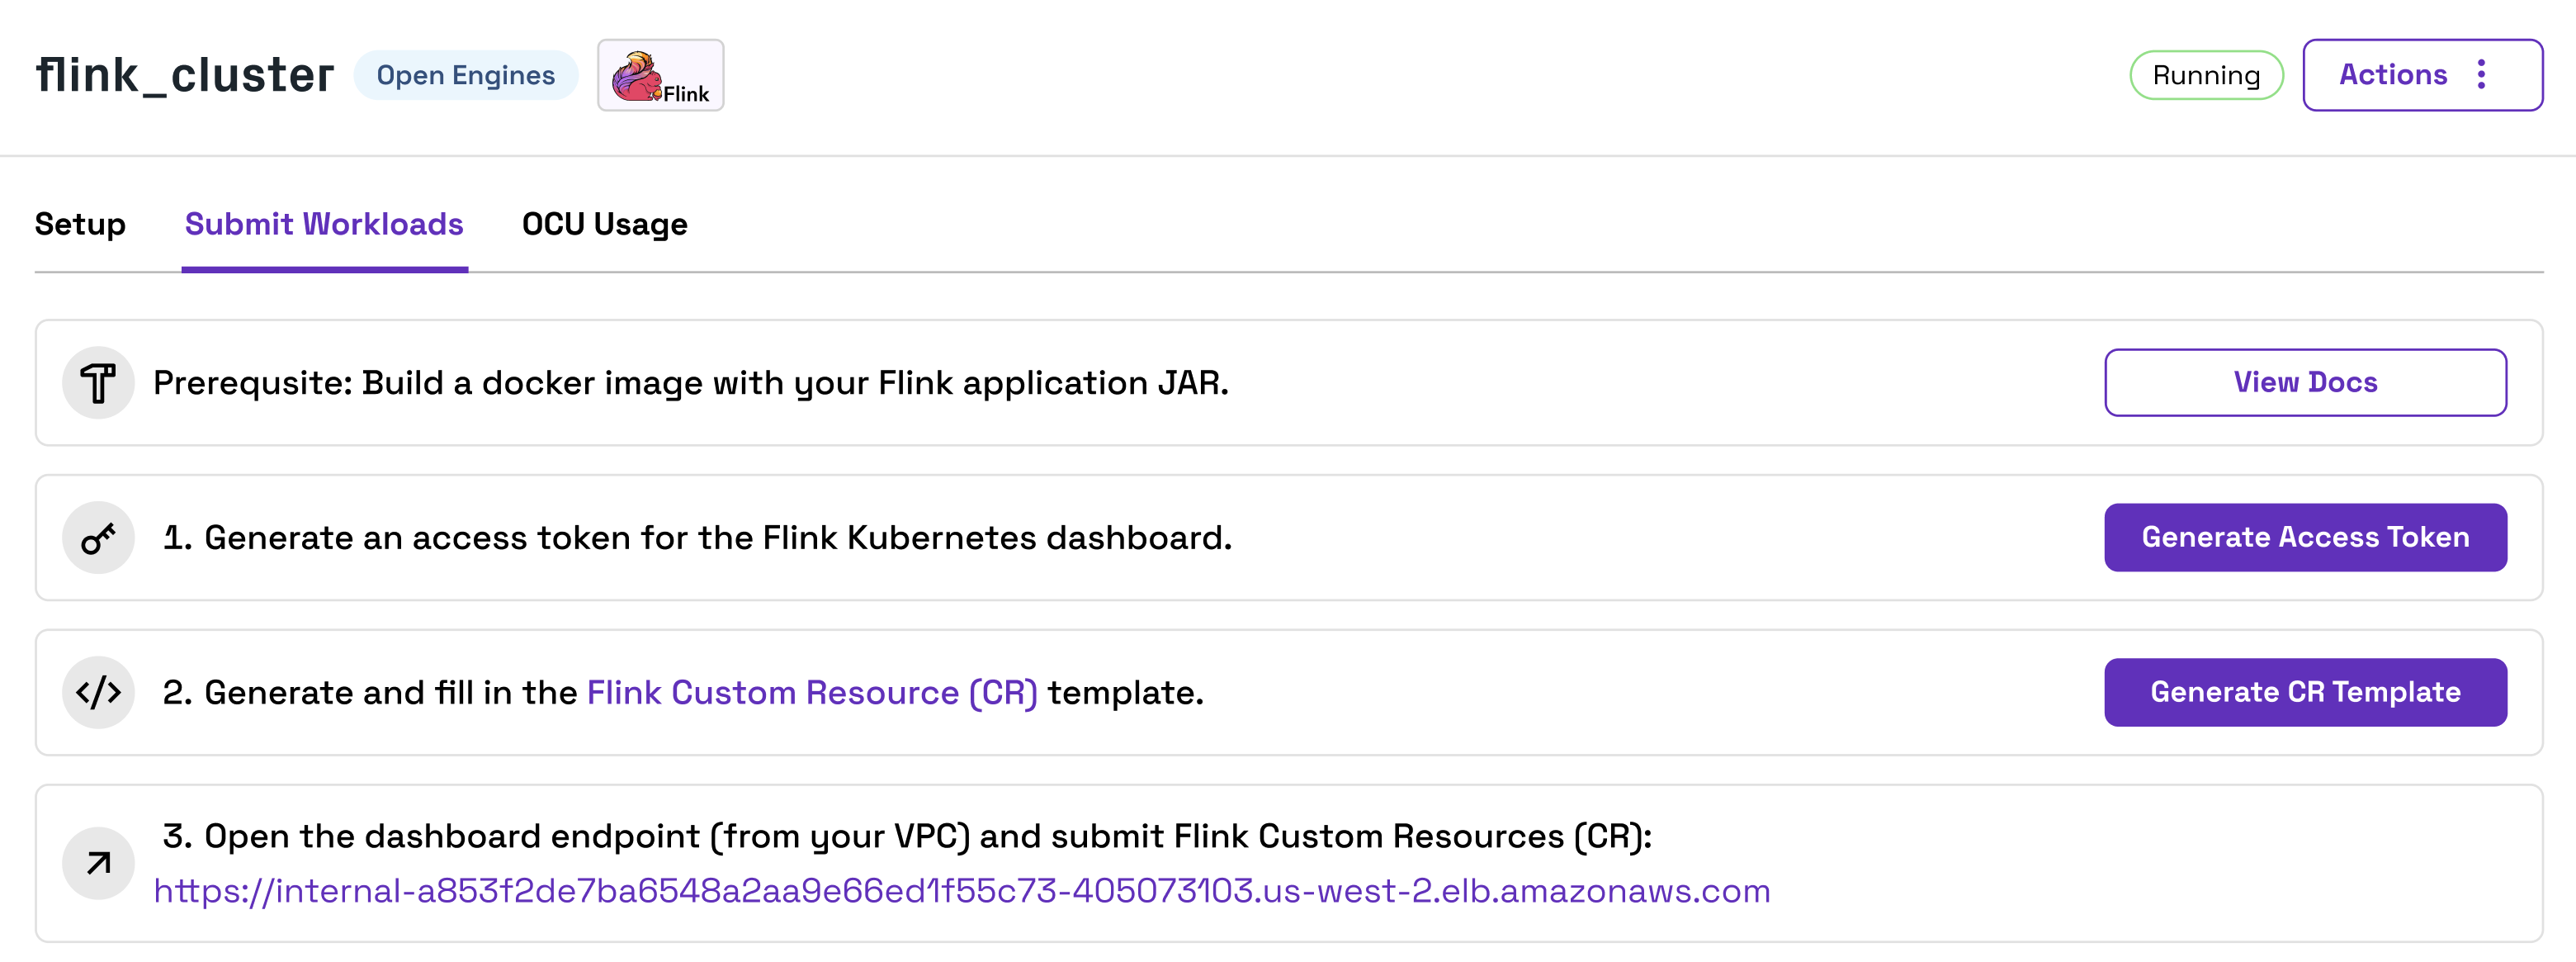
Next, you will create a Kubernetes Access Token and a Custom Resource. Open your Apache Flink Cluster in the Onehouse console and open the Submit Workloads tab.
Click the button to generate an Access Token for Kubernetes, and save the token.
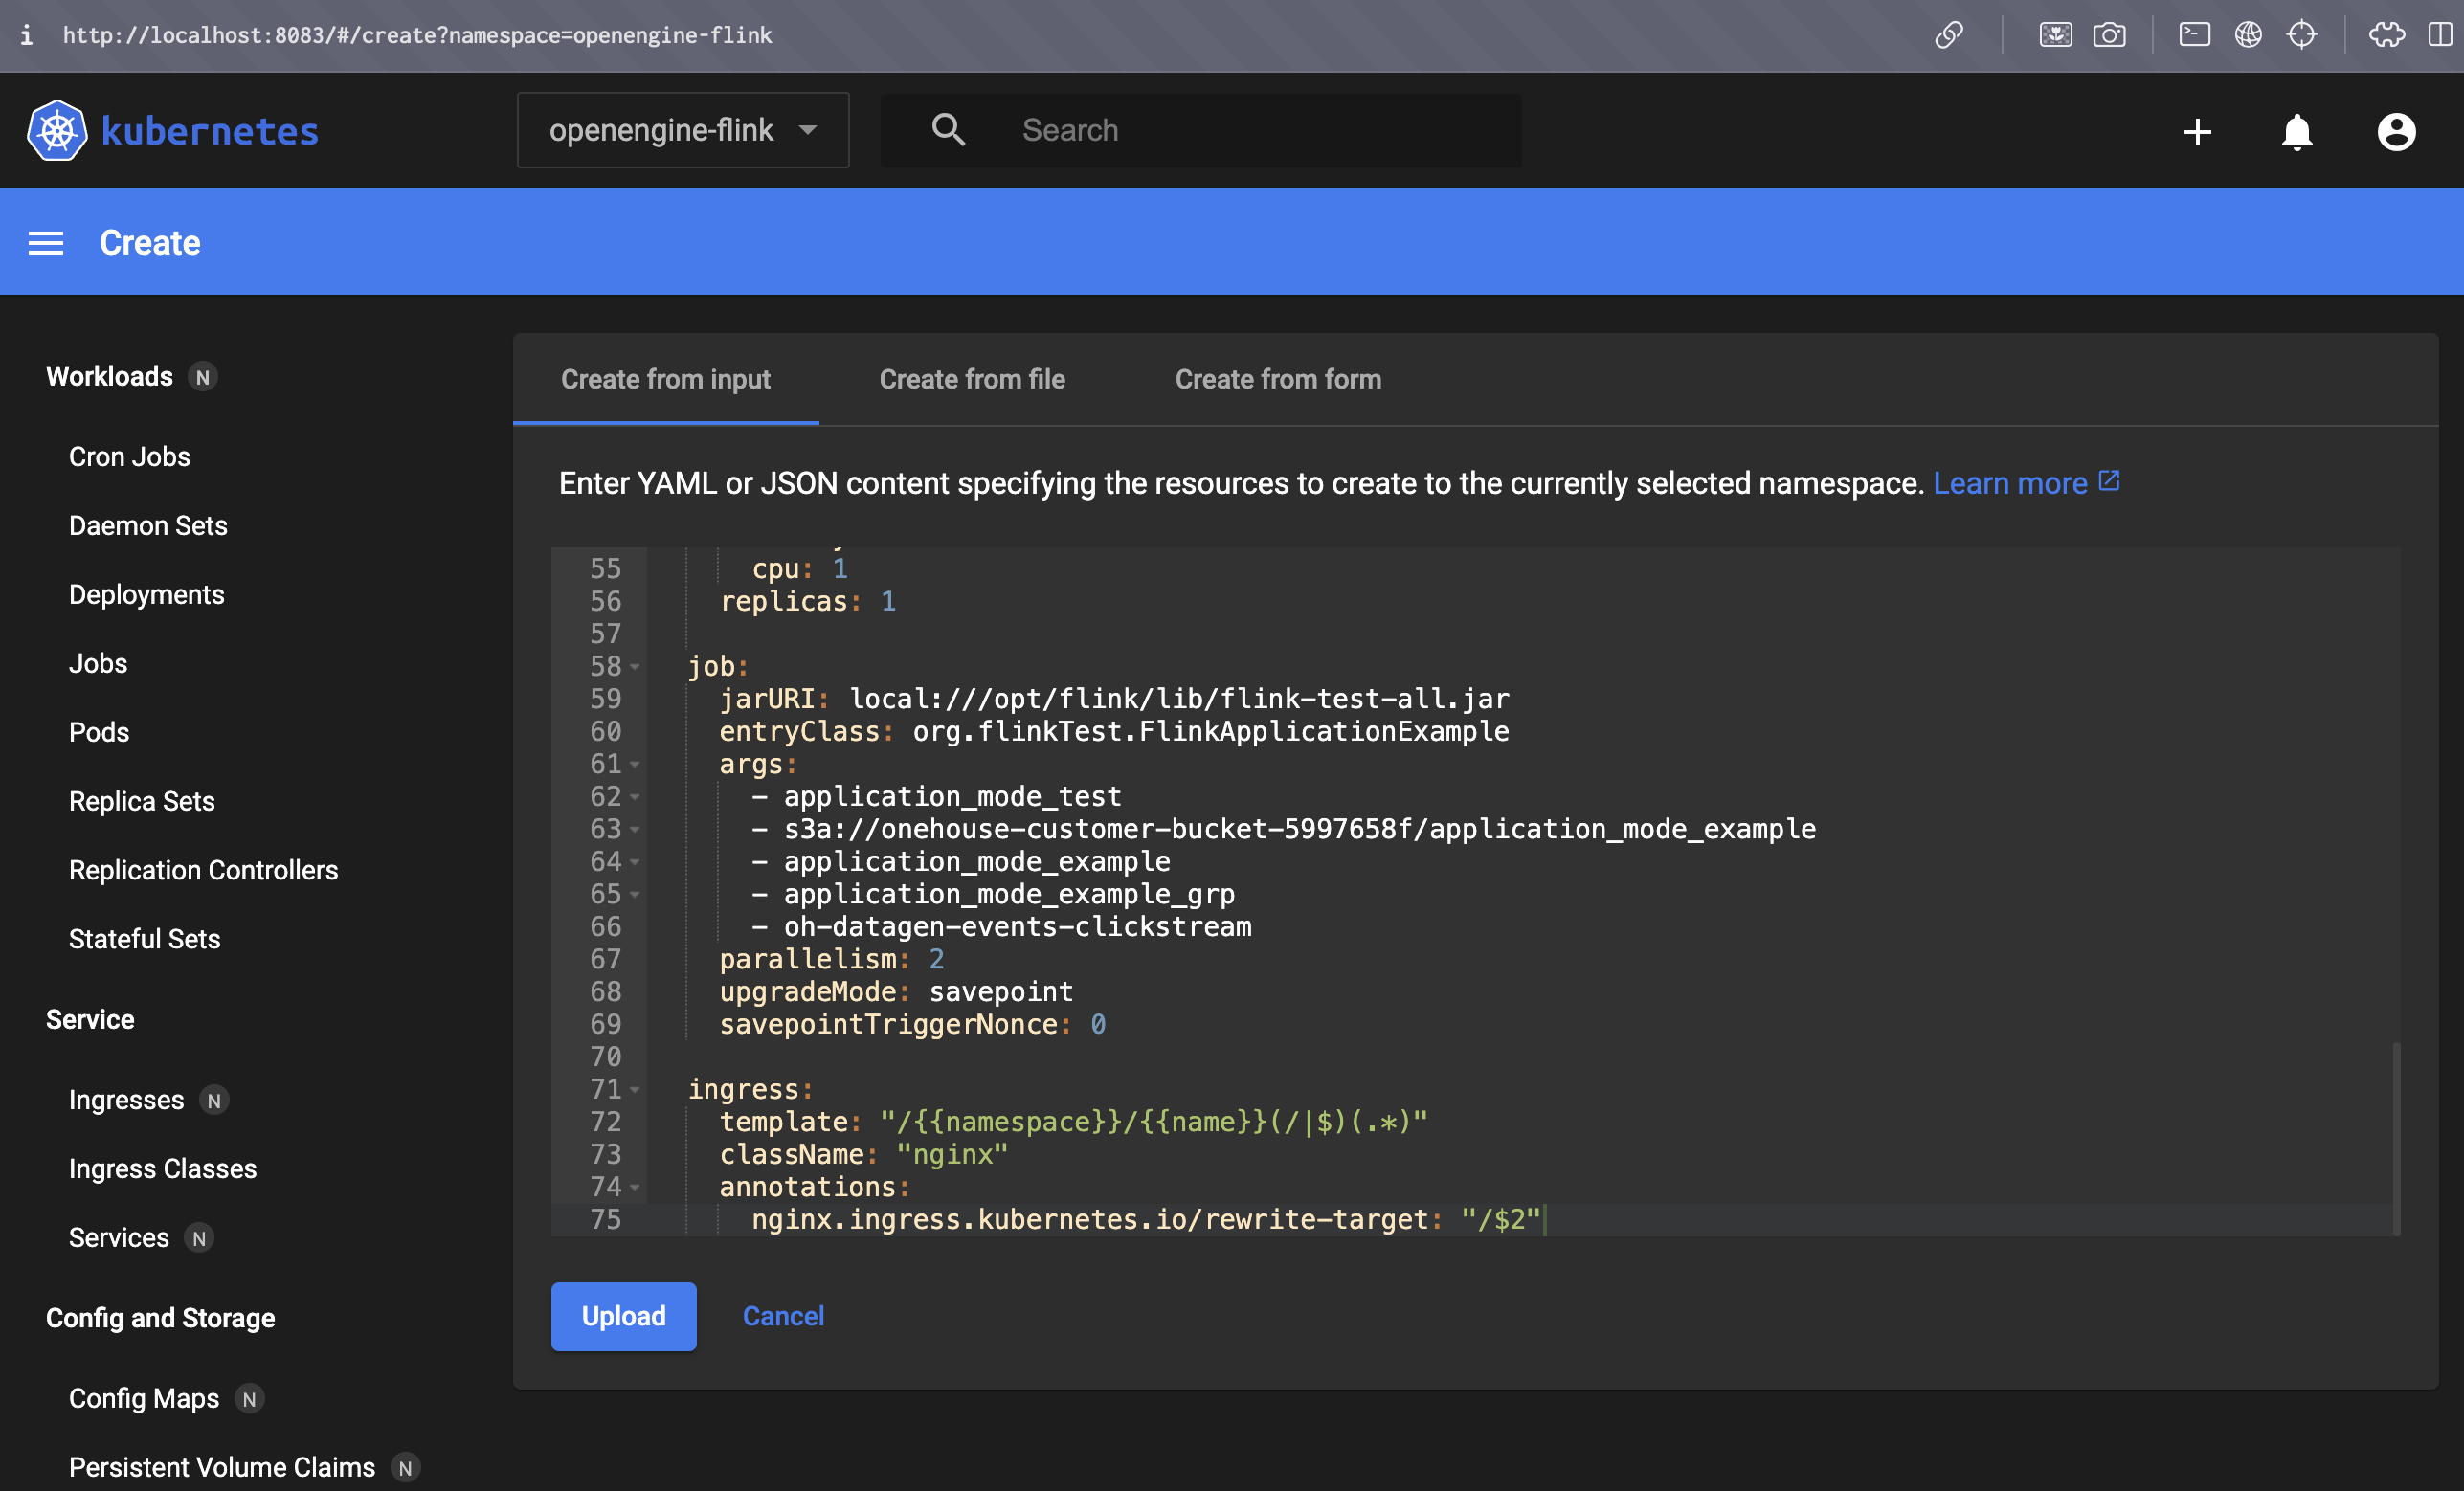
Then, click the button to generate a Custom Resource Template. Save this template locally, and fill in all the templated fields. Below is a sample filled-in Custom Resource (also view the full spec here):
apiVersion: flink.apache.org/v1beta1
kind: FlinkDeployment
metadata:
  name: application-mode-example
  namespace: openengine-flink
spec:
  # DockerHub repo or full uri
  image: onehouse/onehouse-flink-test:8
  imagePullPolicy: Always
  flinkVersion: v1_17
  serviceAccount: flink
  flinkConfiguration:
    classloader.resolve-order: parent-first
    taskmanager.numberOfTaskSlots: "2"
    parallelism.default: "2"
    state.backend.type: filesystem
    state.checkpoints.dir: s3://onehouse-customer-bucket-5997658f/flink-checkpoints
    execution.checkpointing.mode: EXACTLY_ONCE
    execution.checkpointing.interval: "300000"
    execution.checkpointing.min-pause: "60000"
    execution.checkpointing.timeout: "600000"
    execution.checkpointing.max-concurrent-checkpoints: "1"
    execution.checkpointing.externalized-checkpoint-retention: RETAIN_ON_CANCELLATION
    state.savepoints.dir: s3://onehouse-customer-bucket-5997658f/flink-savepoints
    high-availability: kubernetes
    high-availability.storageDir: s3://onehouse-customer-bucket-5997658f/flink-ha
    restart-strategy.type: fixed-delay
    restart-strategy.fixed-delay.attempts: "2147483647"
    restart-strategy.fixed-delay.delay: "10 s"

    job.autoscaler.enabled: "true"
    job.autoscaler.stabilization.interval: 1m
    job.autoscaler.metrics.window: 5m
    job.autoscaler.target.utilization: "0.6"
    job.autoscaler.target.utilization.boundary: "0.2"
    job.autoscaler.restart.time: 2m
    job.autoscaler.catch-up.duration: 5m
    pipeline.max-parallelism: "720"

  podTemplate:
    metadata:
      labels:
        yunikorn.apache.org/app-id: flink-application-id
        yunikorn.apache.org/queue: root.714e55f2-d21f-348c-84d6-dbc69622c4e7
    spec:
  jobManager:
    resource:
      memory: "5Gi"
      cpu: 1
    replicas: 1

  taskManager:
    resource:
      memory: "5Gi"
      cpu: 1
    replicas: 1

  job:
    jarURI: local:///opt/flink/lib/flink-test-all.jar
    entryClass: org.flinkTest.FlinkApplicationExample
    args:
      - application_mode_test
      - s3a://onehouse-customer-bucket-5997658f/application_mode_example
      - application_mode_example
      - application_mode_example_grp
      - oh-datagen-events-clickstream
    parallelism: 2
    upgradeMode: savepoint
    savepointTriggerNonce: 0

  ingress:
    template: "/{{namespace}}/{{name}}(/|$)(.*)"
    className: "nginx"
    annotations:
      nginx.ingress.kubernetes.io/rewrite-target: "/$2"
Finally, you will submit the Custom Resource through the Kubernetes dashboard. Connect to the Kubernetes dashboard endpoint found in the Onehouse console by port forwarding to your local machine.
The Kubernetes dashboard is only accessible from within your VPC. To access the Cluster locally, you must use a VPN or use SSH connect through a bastion host. Below is an example command for connecting through SSH tunnel:
ssh -N ec2-user@35.89.130.210 -L 8083:internal-ad000980114514c75b5863b64be3904a-f663528887.us-west-2.elb.amazonaws.com:80
In your browser, open the port via localhost: http://localhost:<port-forwarding-port>.
For our example:
http://localhost:8083/?namespace=openengine-flink
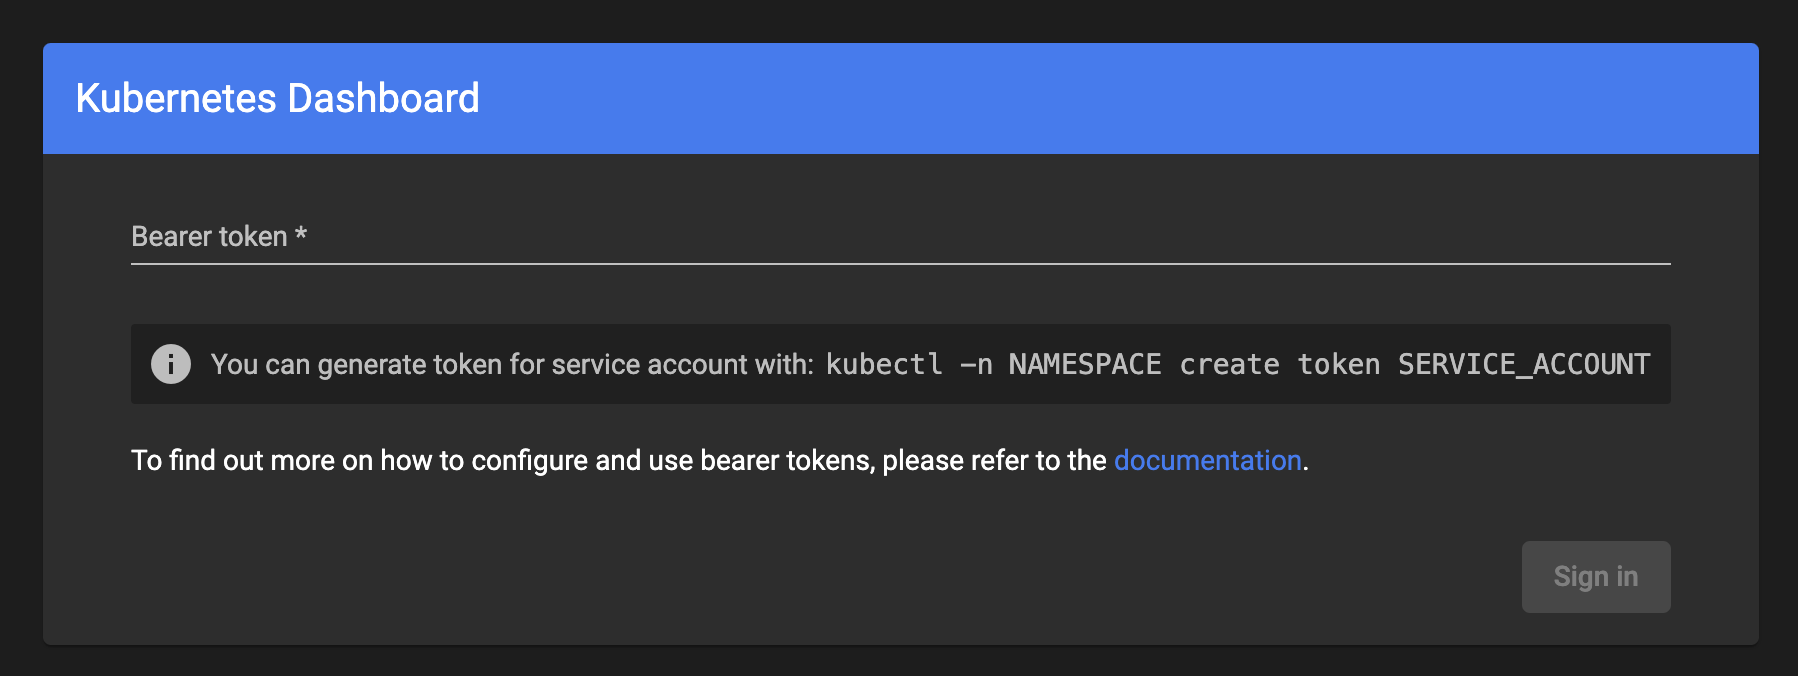
Use the Access Token you retrieved from the Onehouse console to authenticate in the Kubernetes dashboard.
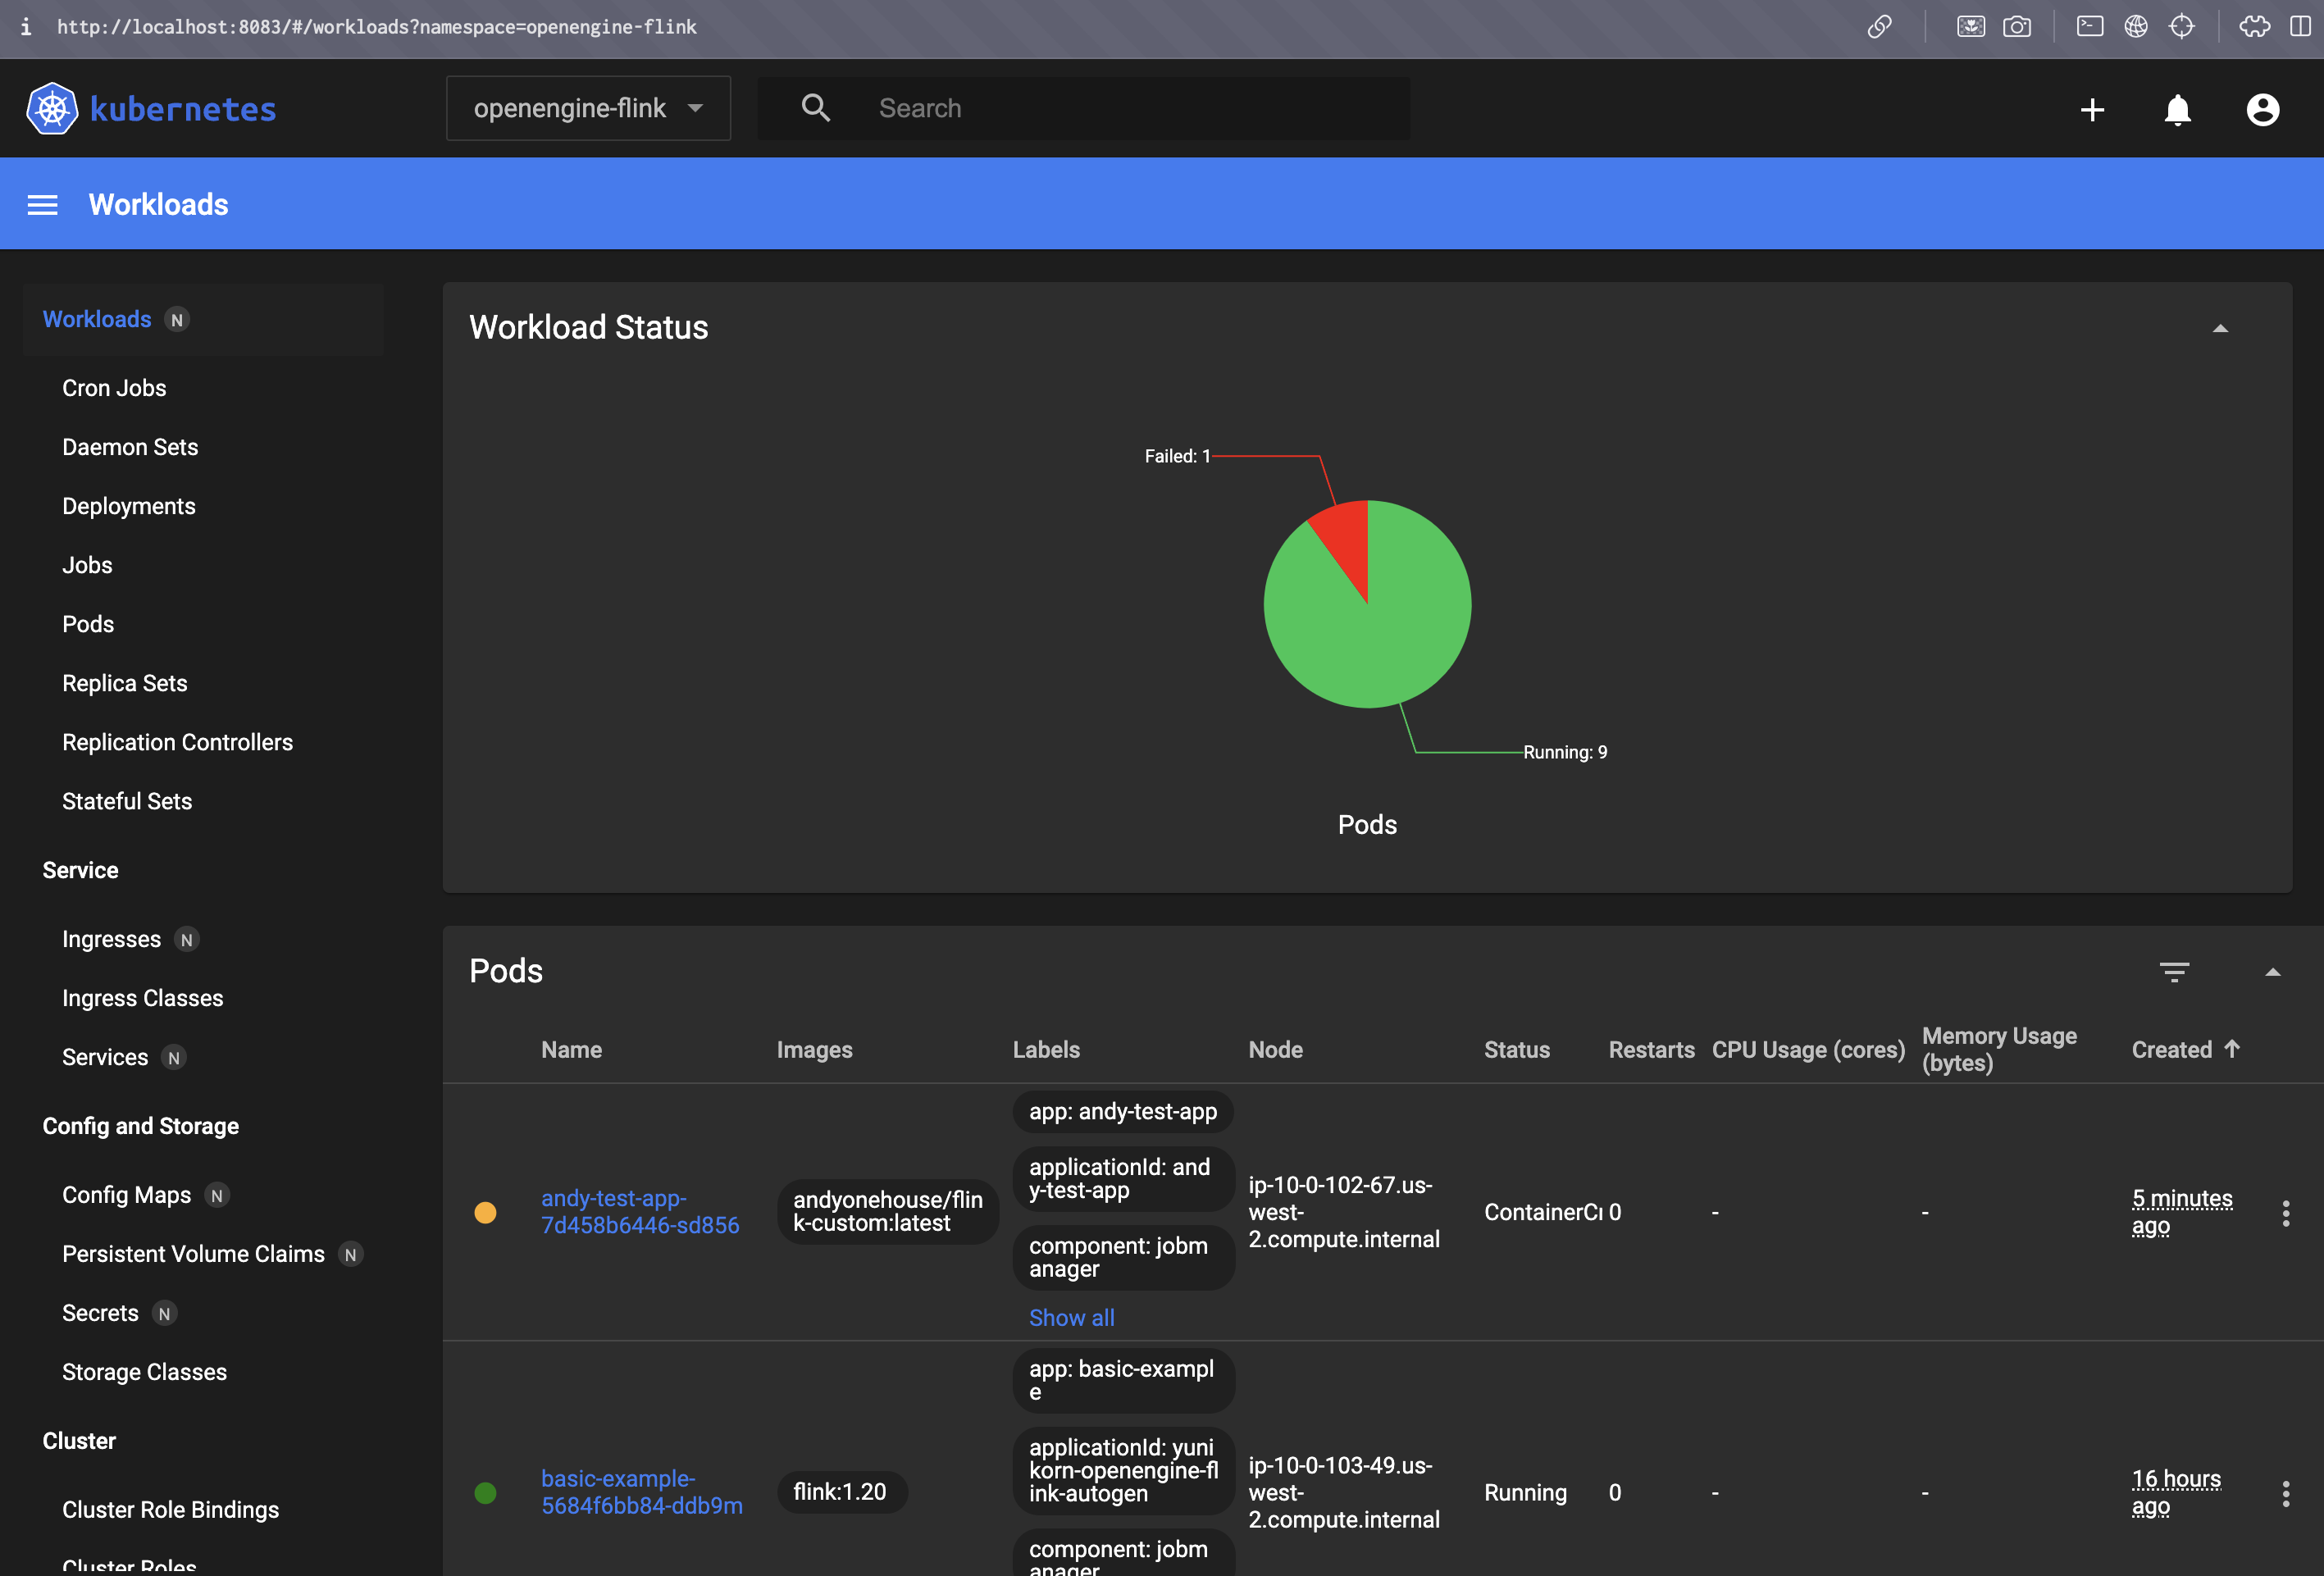
In the Kubernetes dashboard, click "Create", then paste your Custom Resource, and upload.
You can monitor your application on the Workloads page in the Kubernetes dashboard.