Onehouse Cross Account Data Access
Onehouse customers sometimes need to read data from sources — or write to data lakes — that live in a different AWS account than the one the Onehouse data plane (EKS cluster) is deployed in. One of Onehouse's core architectural principles is that data never leaves the customer's VPC; this guide covers the case where you intentionally grant Onehouse access to a resource in another account.
How cross-account access works
Every AWS resource Onehouse touches uses one of two mechanisms, and the mechanism decides where you do the work:
| Mechanism | Services | What you do |
|---|---|---|
| Resource-based policy | Amazon S3, AWS Secrets Manager | Grant access entirely from the account that owns the data. Onehouse's roles already hold the matching IAM permissions (scoped by ARN or by the accessibleTo=onehouse tag), so you just attach a policy to the bucket/secret (and its KMS key) naming the Onehouse roles. No role to create, nothing to assume. |
| Role assumption | Amazon Kinesis, AWS Glue Data Catalog | These have no usable resource-based policy, so you create an IAM role in the account that owns the resource, let Onehouse assume it, and list that role's ARN in your customer stack (crossAccountRoleArns) so Onehouse's roles get sts:AssumeRole. |
The three Onehouse roles
The customer stack creates three roles you'll reference below, each suffixed with the first 8 characters of your Request ID:
| Role | Purpose |
|---|---|
onehouse-customer-core-role-<REQUEST_ID_PREFIX> | Control plane |
onehouse-customer-eks-node-role-<REQUEST_ID_PREFIX> | Data plane — performs the actual reads/writes |
onehouse-customer-support-role-<REQUEST_ID_PREFIX> | Onehouse support team — read-only, for troubleshooting |
Placeholders used throughout this guide
| Placeholder | Meaning |
|---|---|
<DATAPLANE_ACCOUNT_ID> | AWS account ID hosting your Onehouse cluster |
<REQUEST_ID_PREFIX> | First 8 characters of your Request ID (find it in the Onehouse UI under your profile) |
<SOURCE_ACCOUNT_ID> | The other AWS account that owns the data/resource |
<REGION> | Region of the resource |
<ONEHOUSE_ORG_UID> | Your Onehouse organization UID — the OrgID shown in the console account menu (under your profile) |
Resource-policy access
For S3 and Secrets Manager you grant access from the account that owns the resource — Onehouse's roles already carry the necessary IAM permissions.
Amazon S3
Mechanism: resource-based policy (bucket policy + KMS key policy).
Prerequisite: the bucket ARN is listed in your customer stack (s3BucketArns, or s3DataLoad.s3DataSourceBucketArns for raw ingest sources), and — if the bucket is encrypted with a customer-managed KMS key — the key ARN is listed in s3KmsKeys.
Step 1: Add the bucket (and KMS key) to your Onehouse stack
In CloudFormation or Terraform, enable the S3 data source and add your bucket ARN. If the bucket is encrypted with a customer-managed key, also add the KMS key ARN to s3KmsKeys.
- CloudFormation — set the S3 data source parameter to
Trueand add your S3 ARN:
- Terraform — set this parameter to
Truein yourconfig.yamland add your S3 ARN: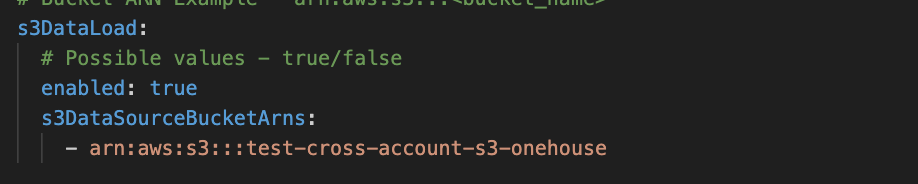
Step 2: Add the bucket policy in the source account
In the source account, open the bucket's Permissions → Bucket policy and add the statements below, filling in <DATAPLANE_ACCOUNT_ID>, <REQUEST_ID_PREFIX>, and <SOURCE_BUCKET_ARN>.
This policy is read-only — Onehouse reads objects from the bucket and (for event-driven ingestion) manages the bucket's notification configuration; it does not write or delete objects. The first two statements cover the node and core roles; the third gives the support team read-only access for troubleshooting (omit it if you don't want support to access this bucket). If this bucket is a managed data lake Onehouse writes tables into — not just a read source — see Granting write access below.
{
    "Version": "2012-10-17",
    "Statement": [
        {
            "Sid": "AccessToDataSourceBucket",
            "Effect": "Allow",
            "Principal": {
                "AWS": [
                    "arn:aws:iam::<DATAPLANE_ACCOUNT_ID>:role/onehouse-customer-eks-node-role-<REQUEST_ID_PREFIX>",
                    "arn:aws:iam::<DATAPLANE_ACCOUNT_ID>:role/onehouse-customer-core-role-<REQUEST_ID_PREFIX>"
                ]
            },
            "Action": [
                "s3:GetBucketNotification",
                "s3:PutBucketNotification",
                "s3:ListBucket",
                "s3:ListBucketVersions",
                "s3:GetBucketVersioning"
            ],
            "Resource": "<SOURCE_BUCKET_ARN>"
        },
        {
            "Sid": "ObjectAccessToDataSourceBucket",
            "Effect": "Allow",
            "Principal": {
                "AWS": [
                    "arn:aws:iam::<DATAPLANE_ACCOUNT_ID>:role/onehouse-customer-eks-node-role-<REQUEST_ID_PREFIX>",
                    "arn:aws:iam::<DATAPLANE_ACCOUNT_ID>:role/onehouse-customer-core-role-<REQUEST_ID_PREFIX>"
                ]
            },
            "Action": [
                "s3:GetObject",
                "s3:GetObjectVersionAttributes",
                "s3:GetObjectRetention",
                "s3:GetObjectAttributes",
                "s3:GetObjectTagging"
            ],
            "Resource": "<SOURCE_BUCKET_ARN>/*"
        },
        {
            "Sid": "OnehouseSupportTeamReadOnlyAccess",
            "Effect": "Allow",
            "Principal": {
                "AWS": "arn:aws:iam::<DATAPLANE_ACCOUNT_ID>:role/onehouse-customer-support-role-<REQUEST_ID_PREFIX>"
            },
            "Action": [
                "s3:ListBucket",
                "s3:ListBucketVersions",
                "s3:GetObject",
                "s3:GetObjectAttributes",
                "s3:GetObjectRetention",
                "s3:GetObjectTagging",
                "s3:GetObjectVersionAttributes"
            ],
            "Resource": [
                "<SOURCE_BUCKET_ARN>",
                "<SOURCE_BUCKET_ARN>/*"
            ]
        }
    ]
}
The support role's own IAM policy grants only read/list actions, so it cannot write to the bucket even though it is named here — the read-only guarantee is enforced on Onehouse's side regardless of the bucket policy.
Step 3: Add the KMS key policy (only if the bucket is encrypted)
If the bucket is encrypted with a customer-managed KMS key, open the key, Switch to policy view, and add the statement below (fill in <SOURCE_KMS_KEY_ARN>).
{
  "Sid": "AllowOnehouseAccessToThisKey",
  "Effect": "Allow",
  "Principal": {
    "AWS": [
      "arn:aws:iam::<DATAPLANE_ACCOUNT_ID>:role/onehouse-customer-eks-node-role-<REQUEST_ID_PREFIX>",
      "arn:aws:iam::<DATAPLANE_ACCOUNT_ID>:role/onehouse-customer-core-role-<REQUEST_ID_PREFIX>",
      "arn:aws:iam::<DATAPLANE_ACCOUNT_ID>:role/onehouse-customer-support-role-<REQUEST_ID_PREFIX>"
    ]
  },
  "Action": [
    "kms:Decrypt",
    "kms:DescribeKey"
  ],
  "Resource": "<SOURCE_KMS_KEY_ARN>"
}
Include the support-role principal only if you added the support-team statement in Step 2. This grants decrypt (read) only — no kms:GenerateDataKey, so none of the roles can write through this key with the policy above.
Granting write access (managed lake)
Everything above is read-only. Grant write only if Onehouse manages tables in this bucket (a cross-account managed data lake) — not for read sources. Add the following for the node and core roles only (never the support role):
- Bucket policy (Step 2): add
s3:PutObjectands3:DeleteObjectto the node/core object statement. - KMS key policy (Step 3): add
kms:GenerateDataKeyto the node/core principals.
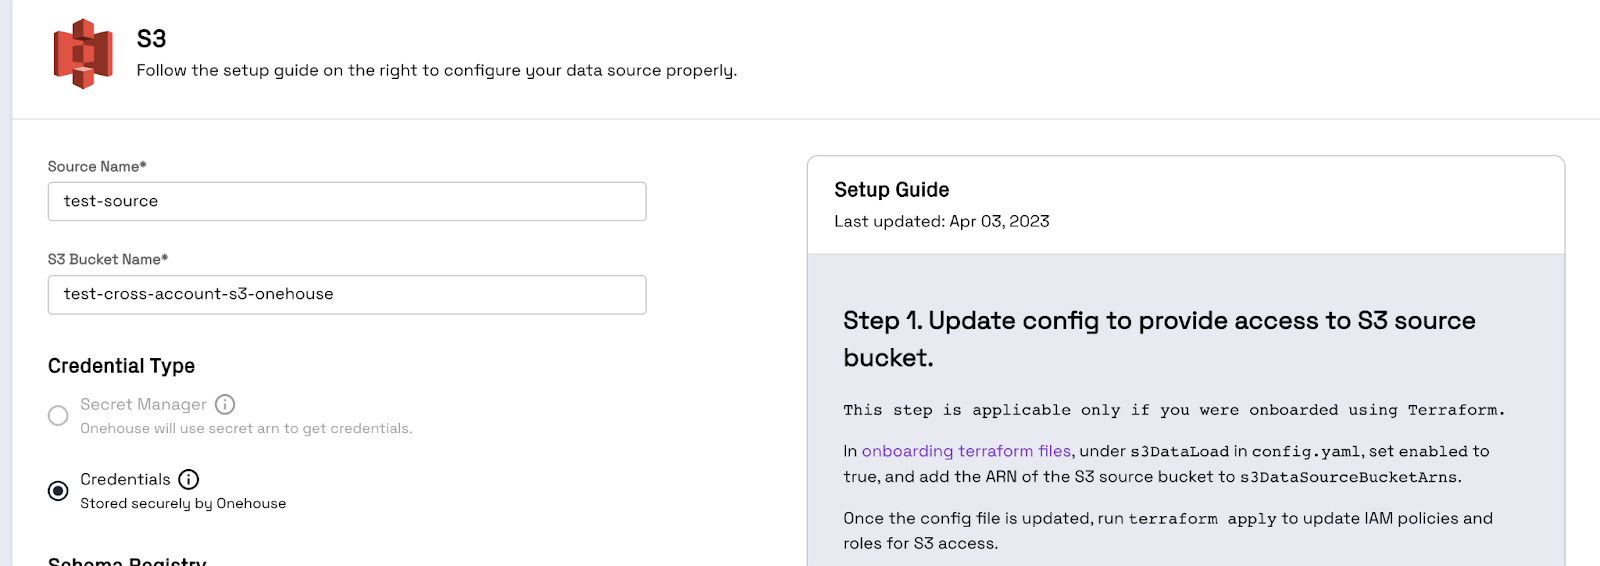
Step 4: Create the S3 source in Onehouse
Set up your S3 source as normal and create Flows that read from this bucket.
(Optional) Reduce cross-account transfer cost with an S3 gateway endpoint
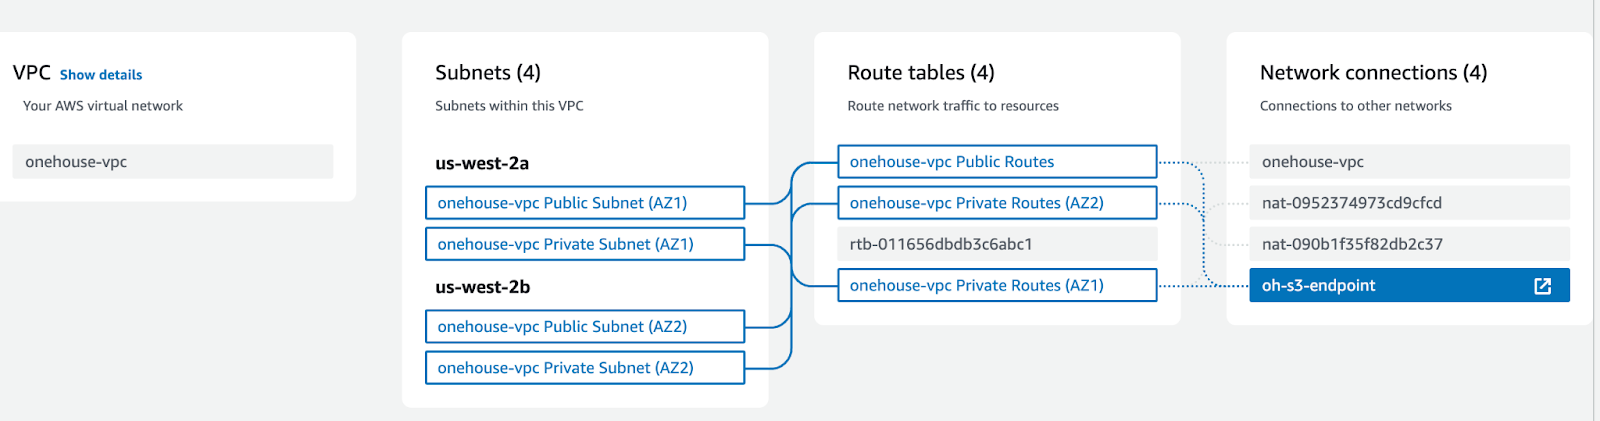
To minimize the cost of cross-account data transfer, add an S3 gateway endpoint to the two private subnets of the VPC where the Onehouse EKS cluster runs:
- In the VPC console, select Endpoints.
- Create endpoint, search for S3, and select the gateway endpoint.
- Specify the VPC your EKS cluster is in.
- Attach the endpoint to the route tables for your private subnets.
The result looks like this:
AWS Secrets Manager
Mechanism: resource-based policy (secret resource policy + KMS key policy).
Prerequisite: you are using Bring Your Own Secrets (BYOS). The Onehouse node role already carries a secretsmanager:GetSecretValue grant scoped to the accessibleTo=onehouse tag.
Cross-account secrets must be encrypted with a customer-managed KMS key (CMK). The default aws/secretsmanager AWS-managed key cannot be shared across accounts.
Step 1: Tag the secret and its KMS key
In the account holding the secret, add the tag accessibleTo = onehouse to both the secret and the CMK that encrypts it. Onehouse's grants are scoped to this tag, so both the secret read and the key decrypt depend on it.
Step 2: Add a resource policy to the secret
On the secret, under Resource permissions, add:
{
  "Version": "2012-10-17",
  "Statement": [
    {
      "Effect": "Allow",
      "Principal": {
        "AWS": "arn:aws:iam::<DATAPLANE_ACCOUNT_ID>:role/onehouse-customer-eks-node-role-<REQUEST_ID_PREFIX>"
      },
      "Action": [
        "secretsmanager:DescribeSecret",
        "secretsmanager:GetSecretValue"
      ],
      "Resource": "*"
    }
  ]
}
Step 3: Add the node role to the KMS key policy
On the CMK, Switch to policy view and add (KMS cross-account requires the key policy to name the principal in addition to the node role's own IAM grant):
{
  "Sid": "AllowOnehouseDecrypt",
  "Effect": "Allow",
  "Principal": {
    "AWS": "arn:aws:iam::<DATAPLANE_ACCOUNT_ID>:role/onehouse-customer-eks-node-role-<REQUEST_ID_PREFIX>"
  },
  "Action": "kms:Decrypt",
  "Resource": "*"
}
Onehouse's node role can only exercise this kms:Decrypt through Secrets Manager (its IAM policy conditions the grant on kms:ViaService=secretsmanager.*.amazonaws.com), so it cannot use your key to decrypt anything other than this secret.
Step 4: Configure the secret in Onehouse
Store and reference the secret as you normally would for BYOS (see the Secrets Management docs for the JSON formats and tag requirements). Onehouse reads it using the node role's own credentials — no role assumption involved.
Role-assumption access
For Kinesis and Glue you create a role in the account that owns the resource, and Onehouse assumes it. In addition to the other-account role below, you must list its ARN in your customer stack (crossAccountRoleArns) so Onehouse's roles are granted sts:AssumeRole on it.
Amazon Kinesis Data Streams
Mechanism: role assumption.
Prerequisite: kinesisDataLoad.enabled = true and the role ARN below is listed in kinesisDataLoad.crossAccountRoleArns in your customer stack. See the "Cross-Account Kinesis Access" section of the terraform-aws-customer-stack instructions for that side.
Step 1: Create the role in the other account
Create an IAM role in the stream's account with the trust and permissions policies below (fill in <DATAPLANE_ACCOUNT_ID>, <REQUEST_ID_PREFIX>, <REGION>, <SOURCE_ACCOUNT_ID>, <STREAM_NAME>).
Trust policy — allows the core, support, and node roles to assume it:
{
  "Version": "2012-10-17",
  "Statement": [
    {
      "Effect": "Allow",
      "Principal": {
        "AWS": [
          "arn:aws:iam::<DATAPLANE_ACCOUNT_ID>:role/onehouse-customer-core-role-<REQUEST_ID_PREFIX>",
          "arn:aws:iam::<DATAPLANE_ACCOUNT_ID>:role/onehouse-customer-support-role-<REQUEST_ID_PREFIX>",
          "arn:aws:iam::<DATAPLANE_ACCOUNT_ID>:role/onehouse-customer-eks-node-role-<REQUEST_ID_PREFIX>"
        ]
      },
      "Action": "sts:AssumeRole"
    }
  ]
}
Permissions policy — the stream read actions are scoped to the stream(s) being read; kinesis:ListStreams, the Glue Schema Registry read actions (needed to deserialize Avro / JSON_SR / Protobuf messages when the schema registry lives in the stream's account), and the CloudWatch read actions (used by Onehouse's throughput estimator) do not support resource-level scoping and so are granted on *:
{
  "Version": "2012-10-17",
  "Statement": [
    {
      "Effect": "Allow",
      "Action": [
        "kinesis:DescribeStream",
        "kinesis:DescribeStreamSummary",
        "kinesis:GetRecords",
        "kinesis:GetShardIterator",
        "kinesis:ListShards",
        "kinesis:ListTagsForStream"
      ],
      "Resource": "arn:aws:kinesis:<REGION>:<SOURCE_ACCOUNT_ID>:stream/<STREAM_NAME>"
    },
    {
      "Effect": "Allow",
      "Action": "kinesis:ListStreams",
      "Resource": "*"
    },
    {
      "Sid": "GlueSchemaRegistryReadAccess",
      "Effect": "Allow",
      "Action": [
        "glue:GetSchemaVersion",
        "glue:GetSchema",
        "glue:GetSchemaByDefinition",
        "glue:ListSchemas",
        "glue:ListSchemaVersions"
      ],
      "Resource": "*"
    },
    {
      "Sid": "KinesisEstimatorCloudWatchRead",
      "Effect": "Allow",
      "Action": [
        "cloudwatch:GetMetricData",
        "cloudwatch:GetMetricStatistics",
        "cloudwatch:ListMetrics"
      ],
      "Resource": "*"
    }
  ]
}
This policy is read-only — Onehouse only consumes records and reads stream/schema/metric metadata; it contains no write actions on your stream.
(Optional) Step 1b: Restrict the trust policy to your organization
Onehouse always sends your Onehouse organization UID as the STS external ID when assuming the role. The external ID is ignored unless your trust policy conditions on it, so this step is optional — add it if you want the role to be assumable only on behalf of your organization:
"Condition": {
  "StringEquals": {
    "sts:ExternalId": "<ONEHOUSE_ORG_UID>"
  }
}
Add the Condition block to the statement in the trust policy above.
Step 2: Set up your Kinesis source
Add the Kinesis source in the Onehouse console and put the role ARN from Step 1 in the IAM Role ARN field. Onehouse then discovers and reads that account's streams using the assumed role's credentials. Leaving the field empty means the streams are in the data plane's own account (the default). With OneHouse SQL, the equivalent is 'kinesis.cross.account.role.arn' = '<role ARN>' in the CREATE SOURCE WITH clause.
Onehouse assumes the role during source creation to list the streams, so the setup is verified up front: if the role is missing from kinesisDataLoad.crossAccountRoleArns, or its trust policy does not allow the Onehouse roles, creation fails with the AWS is not authorized to perform: sts:AssumeRole on resource: arn:... error naming the role, and no source is created.
One source covers one AWS account in one region — reuse it for every stream in that account and region rather than creating a source per stream. Because the permissions policy above scopes the Kinesis actions to stream ARNs in a single region, streams in another region of the same account need their own role and their own source. If the Glue Schema Registry describing those records is also in the stream's account, the same role is used to read it (that is why the permissions policy above includes the Glue Schema Registry read actions).
AWS Glue Data Catalog
Mechanism: role assumption.
Prerequisite: glueSync.enabled = true and the role ARN below is listed in glueSync.crossAccountRoleArns in your customer stack. See the "Cross-Account Glue Access" section of the terraform-aws-customer-stack instructions for that side.
Glue also supports a resource-policy approach (attaching a policy to the Glue catalog that names the Onehouse roles directly, no role assumption). If you prefer that, see Sync across AWS accounts in the Glue Data Catalog docs. This section covers the role-assumption flow.
Step 1: Create the role in the other account
Create an IAM role in the catalog's account with the trust and permissions policies below (fill in <DATAPLANE_ACCOUNT_ID>, <REQUEST_ID_PREFIX>, <REGION>, <SOURCE_ACCOUNT_ID>).
Trust policy — allows the core, support, and node roles to assume it:
{
  "Version": "2012-10-17",
  "Statement": [
    {
      "Effect": "Allow",
      "Principal": {
        "AWS": [
          "arn:aws:iam::<DATAPLANE_ACCOUNT_ID>:role/onehouse-customer-core-role-<REQUEST_ID_PREFIX>",
          "arn:aws:iam::<DATAPLANE_ACCOUNT_ID>:role/onehouse-customer-support-role-<REQUEST_ID_PREFIX>",
          "arn:aws:iam::<DATAPLANE_ACCOUNT_ID>:role/onehouse-customer-eks-node-role-<REQUEST_ID_PREFIX>"
        ]
      },
      "Action": "sts:AssumeRole"
    }
  ]
}
Permissions policy — scoped to the Glue catalog/databases/tables being synced:
{
  "Version": "2012-10-17",
  "Statement": [
    {
      "Effect": "Allow",
      "Action": [
        "glue:GetDatabase",
        "glue:GetDatabases",
        "glue:GetTable",
        "glue:GetTables",
        "glue:GetTableVersion",
        "glue:GetTableVersions",
        "glue:GetPartition",
        "glue:GetPartitions",
        "glue:BatchGetPartition",
        "glue:GetUserDefinedFunction",
        "glue:GetUserDefinedFunctions",
        "glue:SearchTables",
        "glue:CreateDatabase",
        "glue:UpdateDatabase",
        "glue:DeleteDatabase",
        "glue:CreateTable",
        "glue:UpdateTable",
        "glue:DeleteTable",
        "glue:DeleteTableVersion",
        "glue:BatchDeleteTableVersion",
        "glue:CreatePartition",
        "glue:BatchCreatePartition",
        "glue:UpdatePartition",
        "glue:BatchUpdatePartition",
        "glue:DeletePartition",
        "glue:BatchDeletePartition",
        "glue:CreateUserDefinedFunction",
        "glue:UpdateUserDefinedFunction",
        "glue:DeleteUserDefinedFunction"
      ],
      "Resource": [
        "arn:aws:glue:<REGION>:<SOURCE_ACCOUNT_ID>:catalog",
        "arn:aws:glue:<REGION>:<SOURCE_ACCOUNT_ID>:database/*",
        "arn:aws:glue:<REGION>:<SOURCE_ACCOUNT_ID>:table/*",
        "arn:aws:glue:<REGION>:<SOURCE_ACCOUNT_ID>:table/*/*"
      ]
    }
  ]
}
To restrict access to specific databases/tables, replace the wildcard (*) resources with the exact ARNs.
Glue sync writes table metadata into your catalog (create/update/delete databases and tables), so those actions are required for the sync to work. This policy only touches catalog metadata — it does not grant access to the underlying S3 data (grant that separately via the Amazon S3 section). To reduce the writable scope, restrict the resources above to specific databases/tables, or contact the Onehouse solutions team to discuss a reduced-write catalog integration.
Step 2: Set up your Glue catalog
Create the Glue catalog integration as normal in the Onehouse console, and specify the role ARN from Step 1 as the IAM role to use for accessing the catalog. Onehouse reads and writes the catalog using the assumed cross-account role's credentials.
Conclusion
With this guide, Onehouse can read from and write to resources that live in a different AWS account than your Onehouse cluster. For questions on this guide, cross-account writes, multi-region reads/writes, or anything else, reach out to the Onehouse solutions team at solutions@onehouse.ai.