Notebook Clusters
Notebook Clusters deploy a Jupyter notebook on Onehouse infrastructure to run interactive PySpark workloads on the Onehouse Quanton engine.
This feature is in beta, and might not yet be available in your project.
Notebook files are stored on the cluster's attached storage volumes (e.g., AWS Elastic Block Storage). By default, Notebook Clusters include 10 GB of attached storage. Contact Onehouse support if you need additional storage.
File persistence:
- Files are stored independent from the Cluster, and may be recovered after Cluster deletion.
- File loss is rare, but possible in cases such as an outage of the entire Availability Zone (AZ). In the future, we plan to support backing up files to object storage.
Connect to the notebook
- In the Onehouse console, open the Clusters page, click into your Notebooks Cluster.
- At the top of the page, you will see the notebook connection details. Copy the notebook URL.
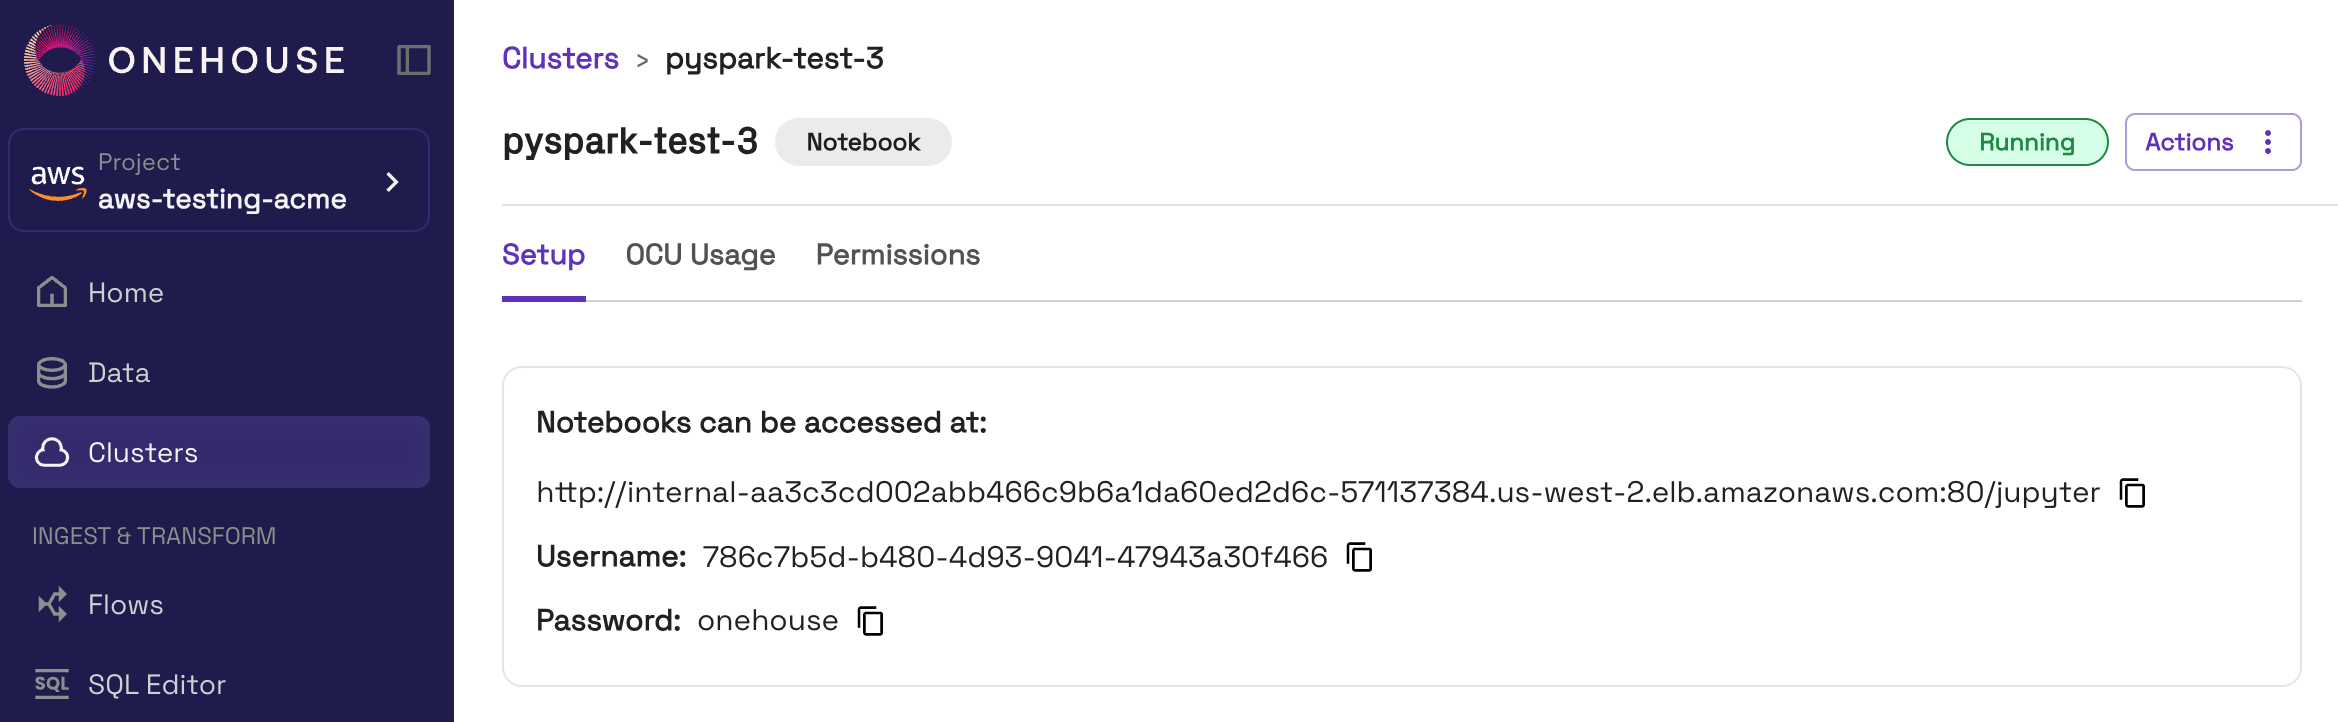
- The notebook is exposed on an internal load balancer, accessible from within your VPC. Follow these steps to connect to the internal load balancer.
- Note: If public access is enabled, you can skip this step. For projects with public access enabled, the notebook URL will start with
https://dp-apps.cloud.onehouse.ai/.
- Note: If public access is enabled, you can skip this step. For projects with public access enabled, the notebook URL will start with
- Enter the event logs URL in your browser to open the Jupyter notebook UI. Sign in with the username and password from the Onehouse console.
- You can now create and run
.ipynbnotebooks in the Jupyter UI.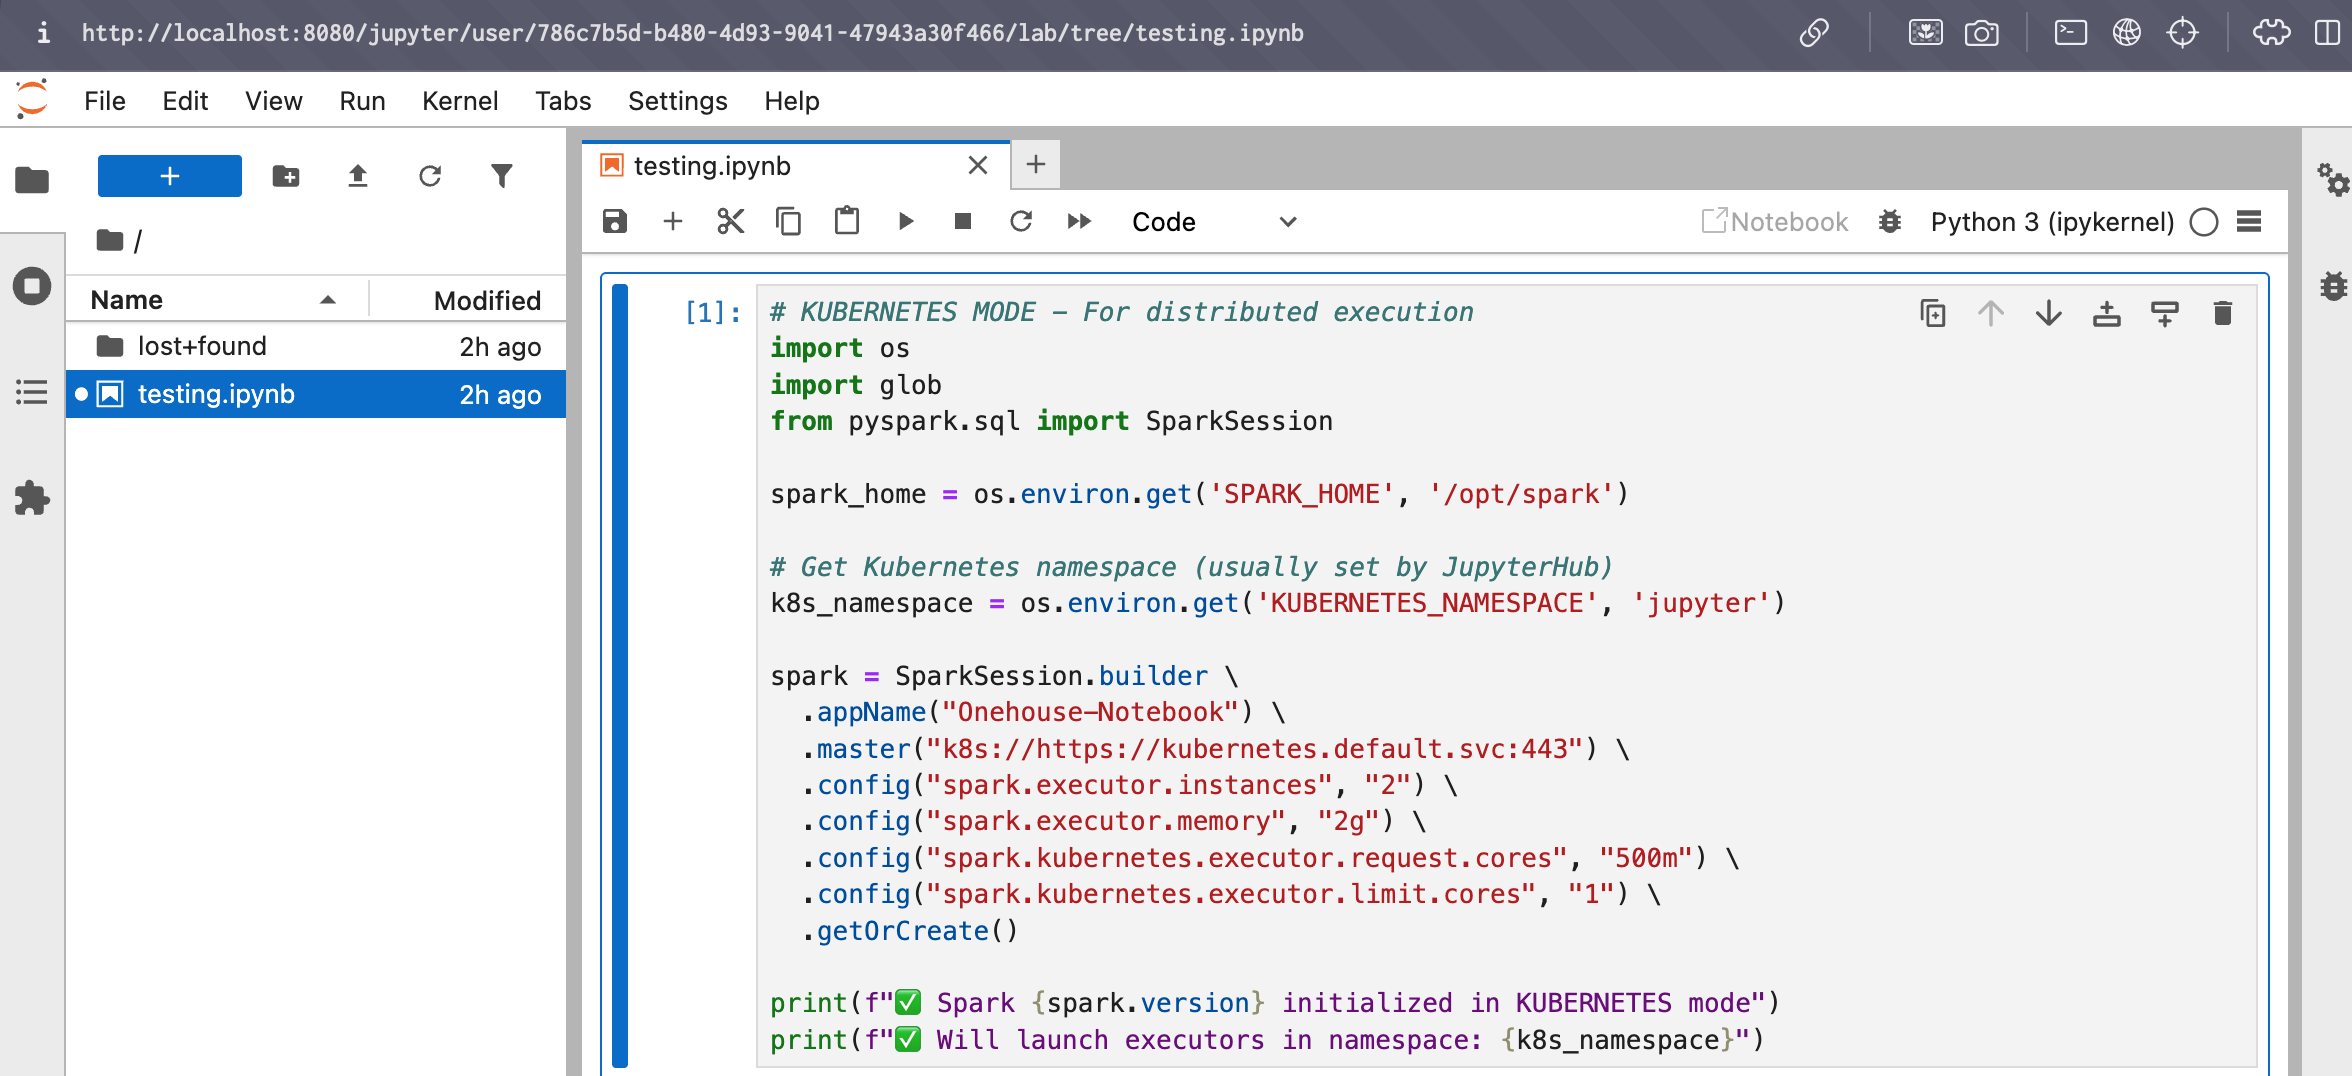
You can change to a different Notebook Cluster by signing out in the Jupyter notebook UI (File > Log out) and signing back in with the other Cluster's credentials.
Managing package dependencies
Notebooks come with several Python packages pre-installed. You may also install more packages with pip install.
Pre-installed packages
The following package come pre-installed on every 'Notebook' Cluster:
- Apache Spark 3.5.2
- Apache Hudi 0.14.1
- Apache Iceberg 1.10.0
Installing packages for notebooks
You can install packages directly on a notebook Cluster. Follow these steps:
- In your notebook, create a new cell and run
pip install:! pip install <package-name> - Restart the Jupyter kernel.
- Your newly-installed packages will be picked up.
Quickstarts
Query an existing Onehouse table
Follow the steps below or download the sample notebook file.
- In the Onehouse console, open the Clusters page. Click Add New Cluster.
- Create a Cluster of type Notebook with the Onehouse Catalog. This configures the Cluster to work with Onehouse tables.
- Follow these steps to connect to your Jupyter notebook.
- In your notebook, create an Apache Spark session:
from pyspark.sql import SparkSession

spark = SparkSession.builder \
.getOrCreate()

print(f"✅ Spark {spark.version} initialized.") - Use the database containing the Onehouse table you want to query:
spark.sql("USE onehouse_db")- You can view your Onehouse databases with:
spark.sql("SHOW DATABASES").show()
- You can view your Onehouse databases with:
- Query the table:
spark.sql("SELECT * FROM my_table").show()- You can view the tables in your database with:
spark.sql("SHOW TABLES").show()
- You can view the tables in your database with:
Create and query a Onehouse table
Follow the steps below or download the sample notebook file.
-
In the Onehouse console, open the Clusters page. Click Add New Cluster.
-
Create a Cluster of type Notebook with the Onehouse Catalog. This configures the Cluster to work with Onehouse tables.
-
Follow these steps to connect to your Jupyter notebook.
-
In your notebook, create an Apache Spark session:
from pyspark.sql import SparkSession

spark = SparkSession.builder \
.getOrCreate()

print(f"✅ Spark {spark.version} initialized.") -
Set your database:
spark.sql("USE onehouse_db") -
Create a Onehouse table in the Apache Hudi format:
spark.sql("""
CREATE TABLE my_table (
    id BIGINT,
    name STRING,
    email STRING,
    created_at TIMESTAMP,
    updated_at TIMESTAMP
)
USING hudi
TBLPROPERTIES (
    'type' = 'cow',
    'primaryKey' = 'id',
    'preCombineField' = 'updated_at',
    'hoodie.metadata.enable' = 'true',
    'hoodie.datasource.write.recordkey.field' = 'id',
    'hoodie.datasource.write.precombine.field' = 'updated_at',
    'hoodie.datasource.write.table.name' = 'my_table'
)
""")
Create the table in the Apache Hudi formatFor tables to appear in the Onehouse console and be compatible with table services, you should create the table in the Apache Hudi format.
You don't need to include
LOCATIONwhen creating the table. This will automatically be set based on the cloud storage path of your database. -
Verify the table creation:
spark.sql("DESCRIBE EXTENDED my_table").show(truncate=False) -
Insert sample data:
spark.sql("""
    INSERT INTO my_table VALUES
        (1, 'Alice', 'alice@example.com', current_timestamp(), current_timestamp()),
        (2, 'Bob', 'bob@example.com', current_timestamp(), current_timestamp()),
        (3, 'Charlie', 'charlie@example.com', current_timestamp(), current_timestamp())
""") -
Query the table:
spark.sql("SELECT id, name, email FROM my_table").show()- You can view the tables in your database with:
spark.sql("SHOW TABLES").show()
- You can view the tables in your database with:
-
Check the table properties:
spark.sql("SHOW TBLPROPERTIES my_table").show(truncate=False) -
View your table in the Onehouse console:
- In the Onehouse console, open the Data page and navigate to your Database > Table. Here you will see an overview of the new table:
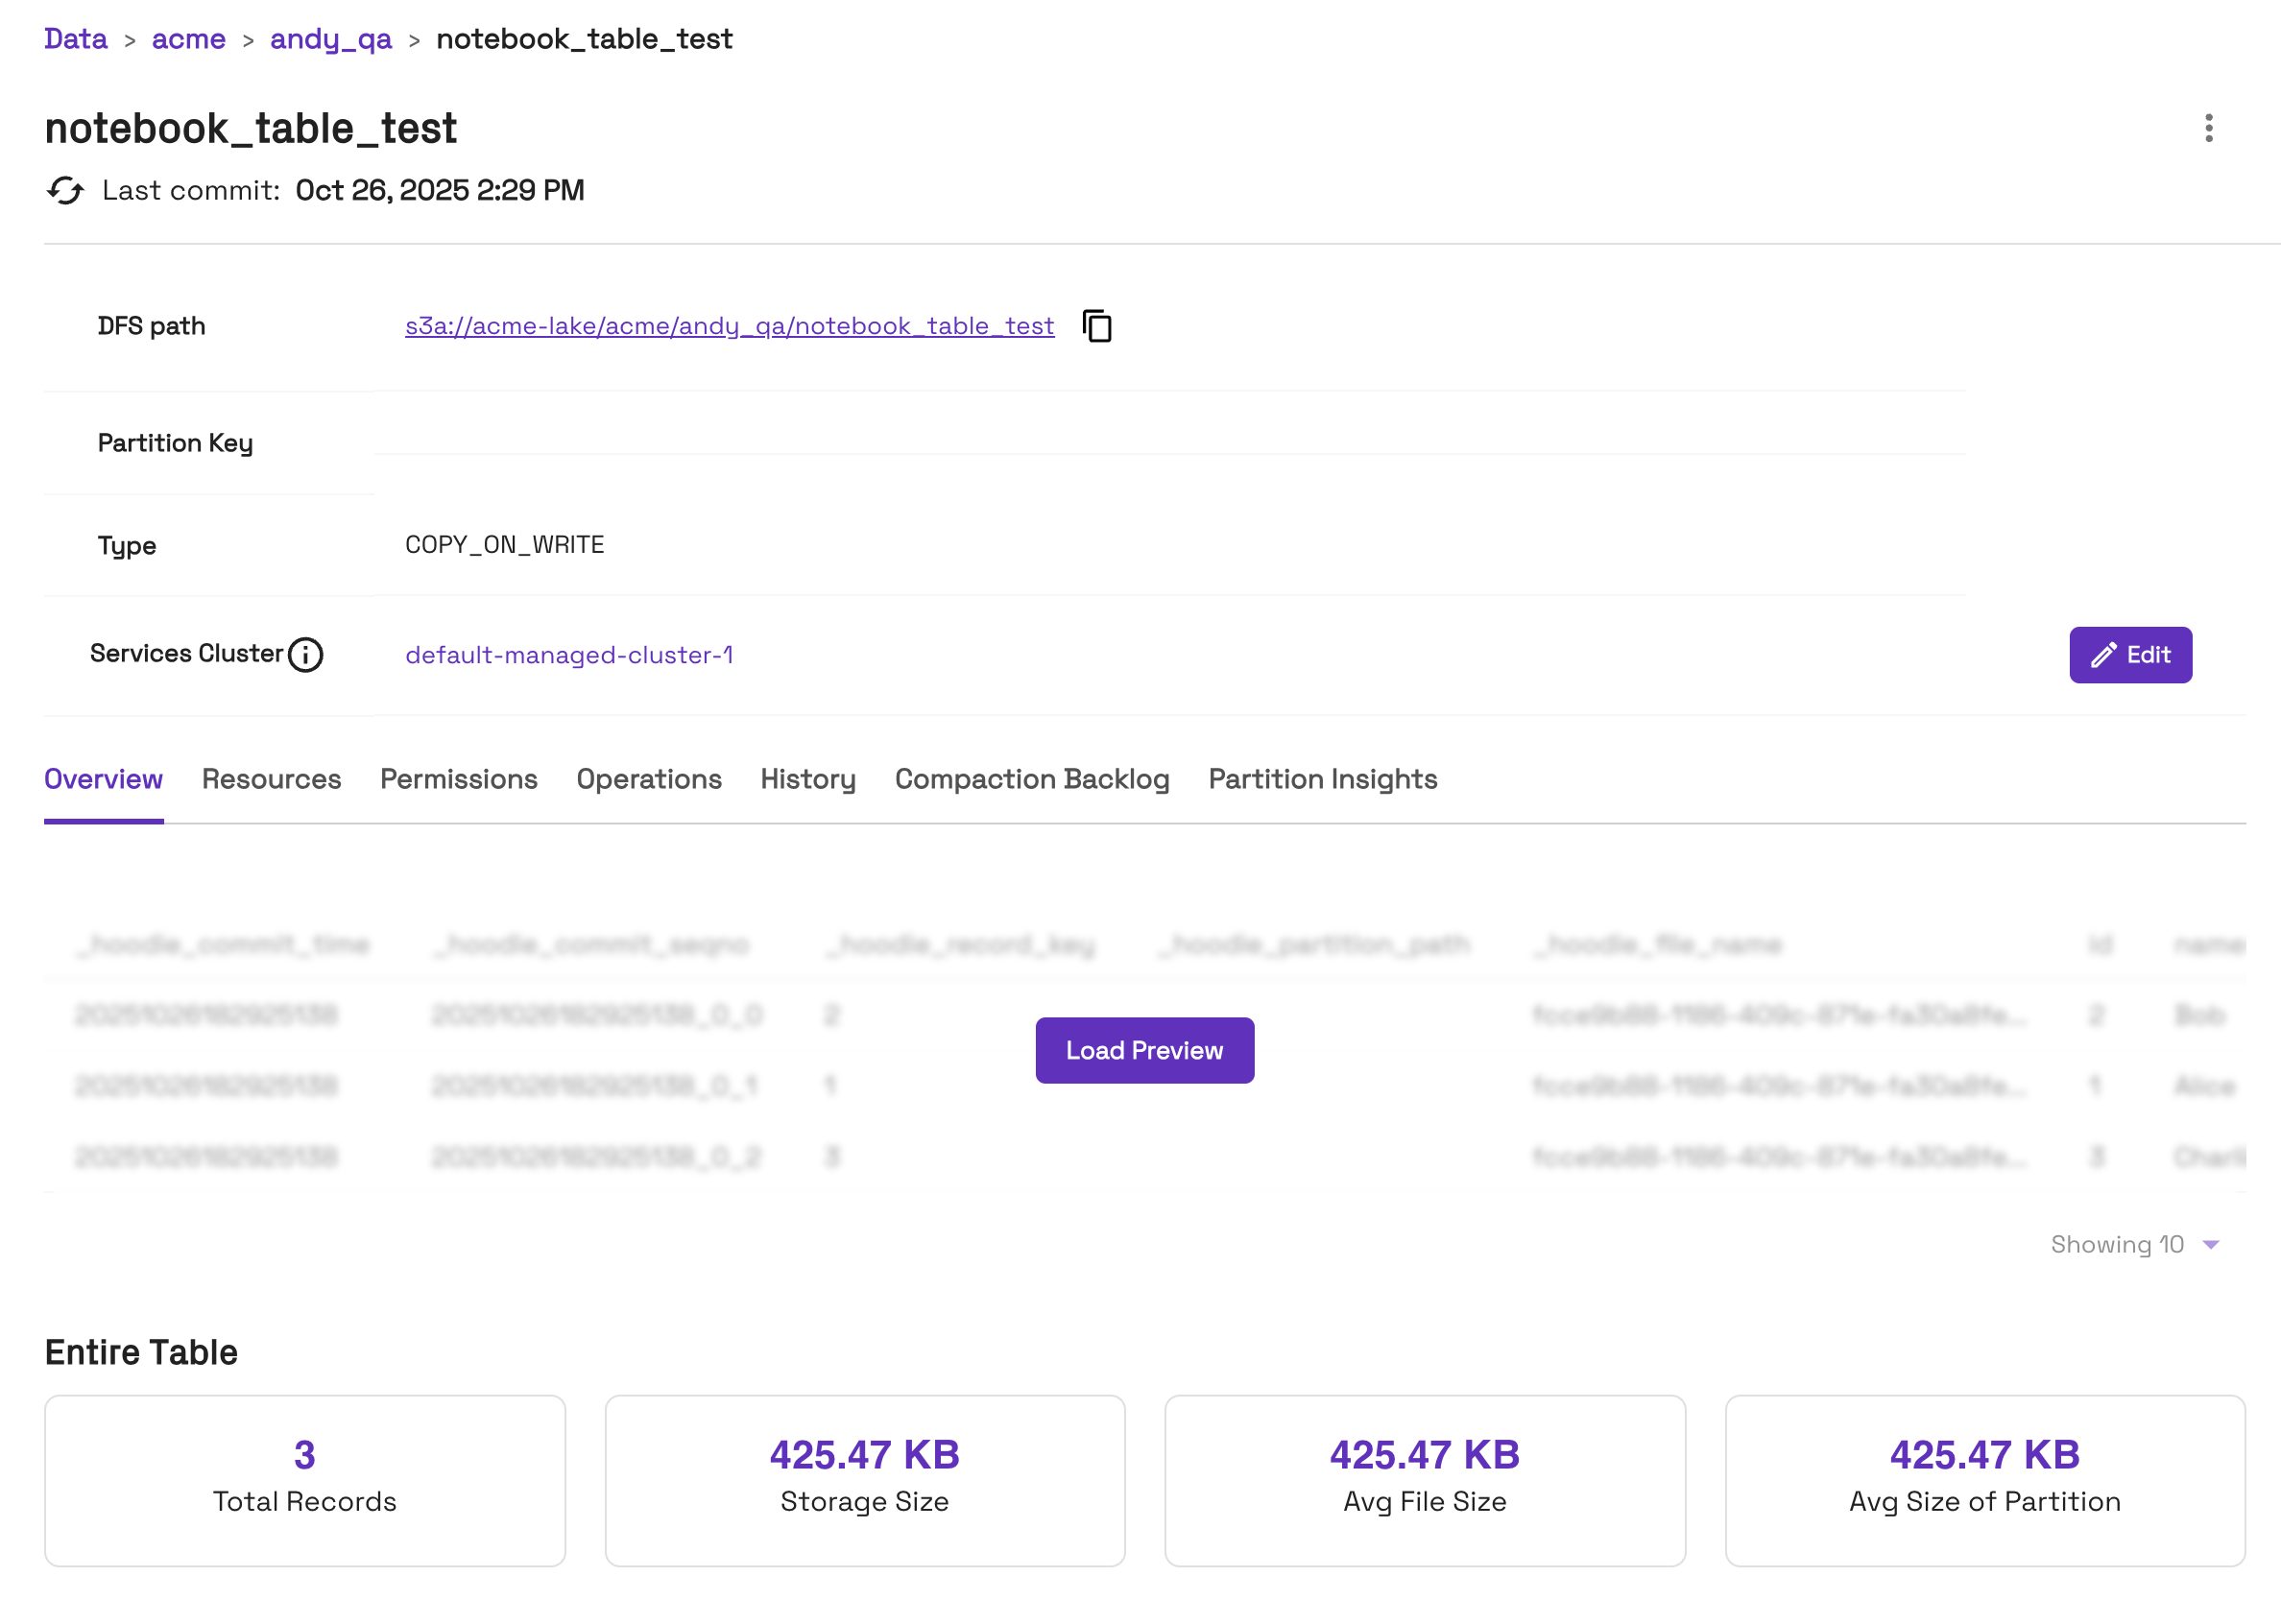
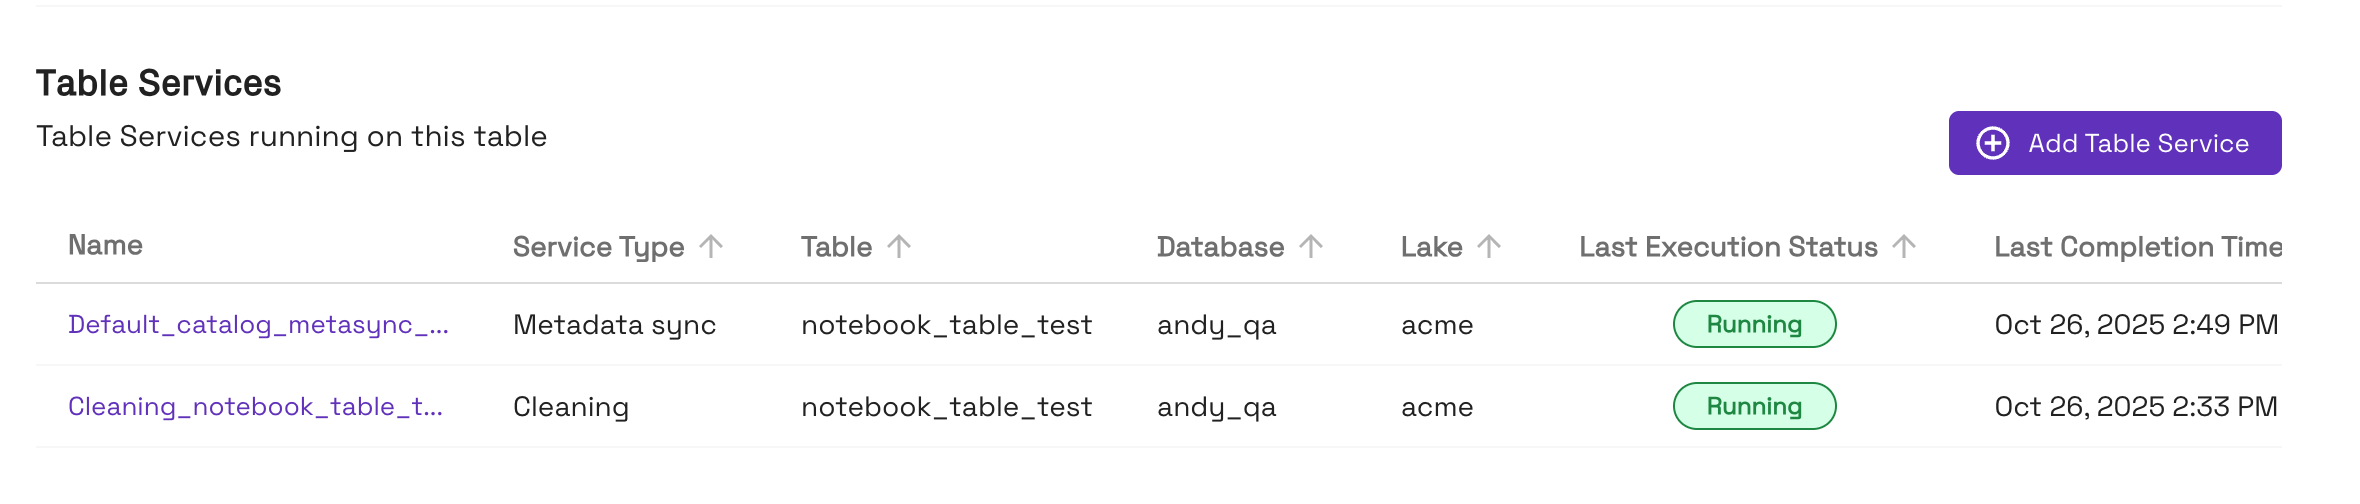
- Tables created with the Onehouse catalog will automatically have table services enabled:
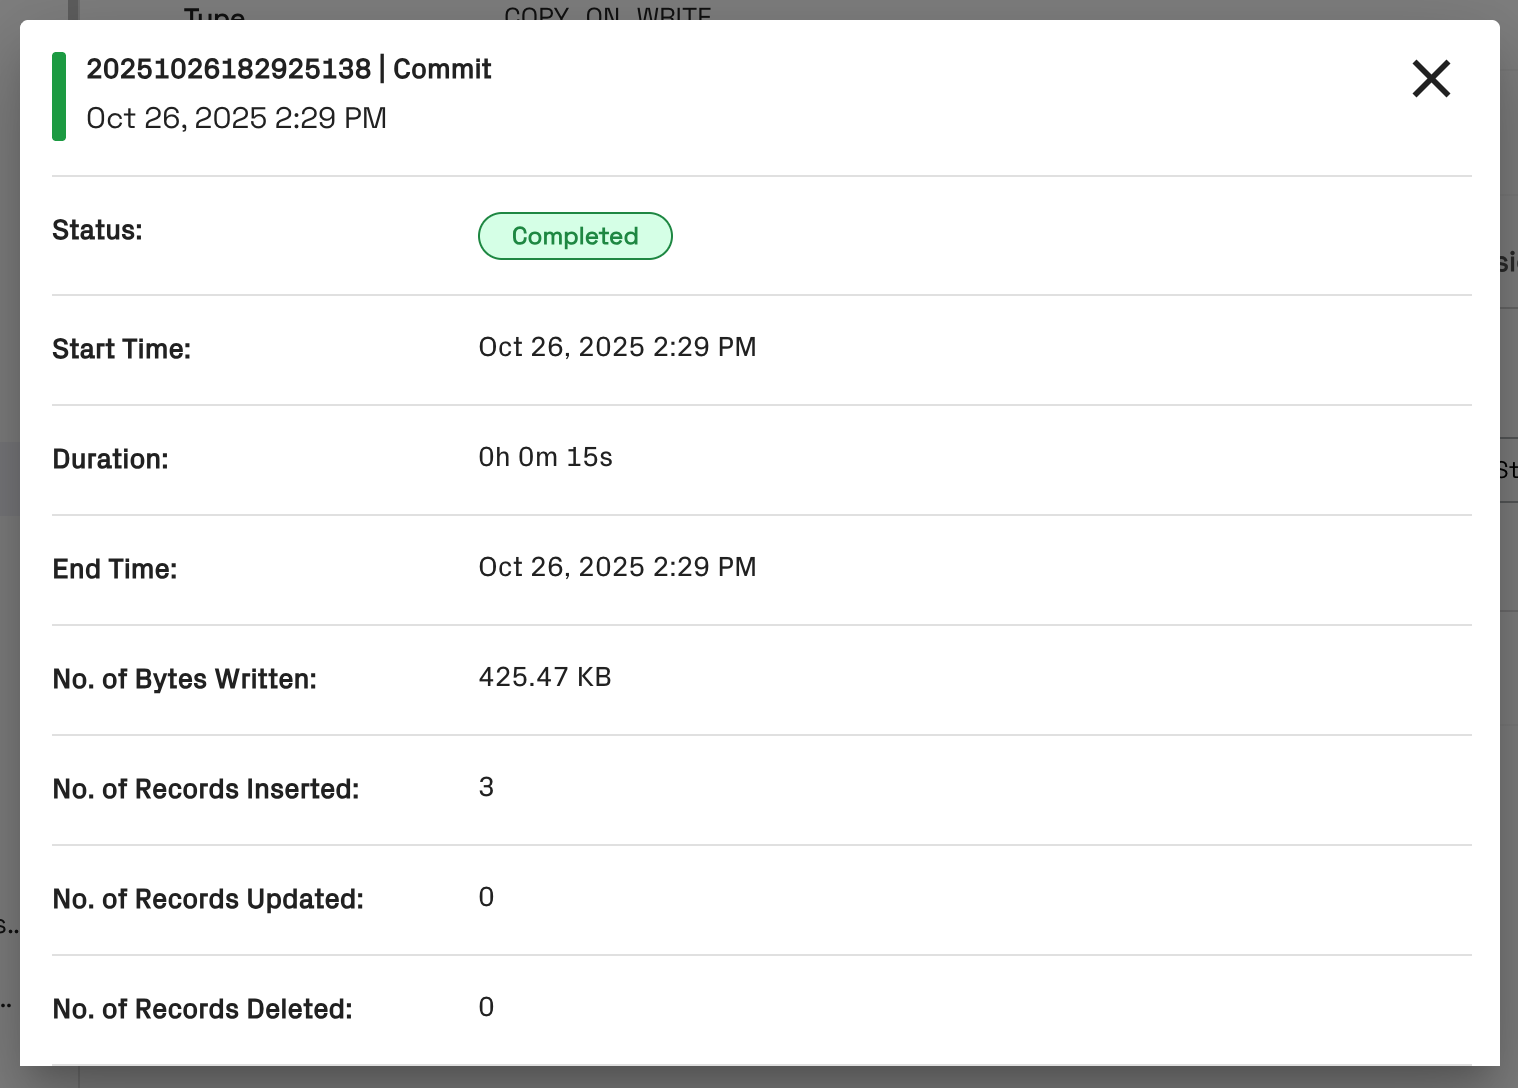
- On the History tab for the table, you can view commits:
- In the Onehouse console, open the Data page and navigate to your Database > Table. Here you will see an overview of the new table:
Query an external Apache Iceberg table
Follow the steps below or download the sample notebook file.
- In the Onehouse console, open the Clusters page. Click Add New Cluster.
- Create a Cluster of type Notebook and set the catalog to an Apache Iceberg REST Catalog (IRC), such as AWS Glue IRC or Snowflake Open Catalog. This configures the Cluster to work with Apache Iceberg tables.
- Follow these steps to connect to your Jupyter notebook.
- In your notebook, create an Apache Spark session:
from pyspark.sql import SparkSession

spark = SparkSession.builder \
.getOrCreate()

print(f"✅ Spark {spark.version} initialized.") - Use the database from your IRC containing the Apache Iceberg table you want to query:
spark.sql("USE my_database")- You can view your the databases in your catalog with:
spark.sql("SHOW DATABASES").show()
- You can view your the databases in your catalog with:
- Query the table:
spark.sql("SELECT * FROM my_iceberg_table").show()- You can view the tables in your database with:
spark.sql("SHOW TABLES").show()
- You can view the tables in your database with:
Common Issues
- If the Cluster is cold, workers may take up to 5min to spin up. You may see warnings such as
Initial job has not accepted any resources. After the workers spin up, your notebook will run as expected. - You may run into occasional "Spawn failed" errors in the Jupyter UI. If this occurs, you should sign out and sign back in with the credentials from the Cluster page in the Onehouse console.
- By default, all logs are output to stderr and displayed in the notebook. You can filter logs by log level to reduce noise by adding the following snippet after your Spark session is initialized:
from pyspark.sql import SparkSession

spark = SparkSession.builder \
.getOrCreate()

# Filter logs to errors
spark.sparkContext.setLogLevel("ERROR")
Limitations
- The Apache Spark UI is not yet available for Notebook Clusters.