Integrate Snowflake with Onehouse
Introduction
This guide helps users integrate Snowflake with a data lakehouse created with Onehouse.
Solution Overview
The Onehouse data lakehouse platform is built on top of open source projects including Apache Hudi, Apache Iceberg, and Delta Lake, bringing blazing fast data ingestion and seamless interoperability together so users with streaming workloads can easily integrate with their choice of query engines and data warehouses to support their analytics workloads.
Snowflake is a cloud data warehouse platform that can store and analyze all your data in one place. It decouples compute and storage and can automatically scale up/down its resources to load, integrate, and analyze data. Snowflake supports querying the data as native Snowflake tables or as external tables. Snowflake announced its public-preview support for Apache Iceberg in its platform in 2022. Onehouse writes and optimizes Apache Iceberg tables and can unlock interoperability between Onehouse, Snowflake, and other data platforms based on the Iceberg support from Snowflake.
When using Onehouse/Snowflake integration, Onehouse automates the creation of Iceberg tables and continuously manages schema evolution and other synchronizations necessary to keep the tables and data up-to-date in Snowflake.
Architecture and Integration
In this guide, we will look into how Onehouse integrates with Snowflake using Apache Iceberg.
There are multiple ways to create an open lakehouse table in Snowflake. In this case, we will use the metadata files to register Apache Iceberg tables in Snowflake. This method enables Onehouse to efficiently manage the ingestion and ETL work, including providing users with easier ways to clean, process and validate their data. This empowers the users to focus on deriving more business value from their data through analytics and reporting.
This guide shows you the steps to create a managed data lakehouse where ETL workloads are managed by Onehouse (using the OBJECT_STORE catalog type) and analytical workloads are run in Snowflake.
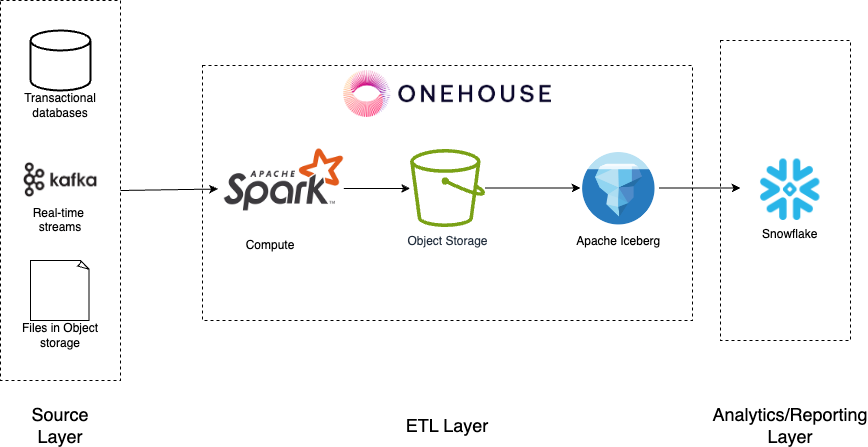
We will also use AWS as a cloud service provider in this guide with both Onehouse and Snowflake.
Note: We can achieve a similar architecture with Google Cloud Platform.
Prerequisites
Before setting up the pipeline in Onehouse, make sure you have completed the following:
- Activate a Onehouse account with access to create a data lake, source, stream capture and catalog. If you’re a new user and want to leverage Onehouse for Data Lakehouse management workloads, please sign up for a trial
- Connect your AWS account with Onehouse by following the steps in the Onehouse documentation
- Create an S3 bucket where the data lakehouse tables can be stored
- Activate a Snowflake account with access to create a database, external volume and catalog integration
- Create a Snowflake external volume integrated with Amazon S3 by following these steps. Point the STORAGE_BASE_URL to the S3 bucket you created above in Step 3.
- Create a Snowflake catalog integration with S3 Object Storage by following these steps
Implementation Steps
AWS setup
Step 1: Upload a sample dataset to S3
- Download this sample dataset of NYC Taxi & Limousine Commission Trip Record Data
- Upload the parquet file to S3, under s3://{bucket-name}/raw_files/
Onehouse setup
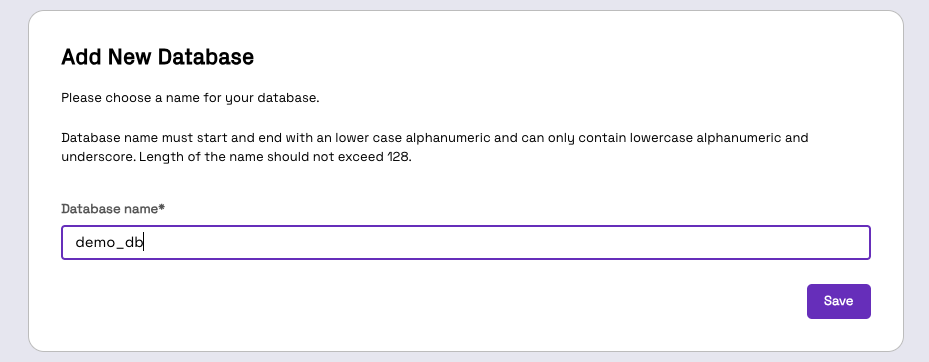
Step 1: Create a new Data Lake and Database
- Navigate to your Onehouse console, and under Data click on Create Lake and give an appropriate name, e.g. demo_lake and the Root Path* as s3://{bucket-name}/processed_zone/

- Under
demo_lake, click onNew Databaseand providedemo_dbasDatabase name*
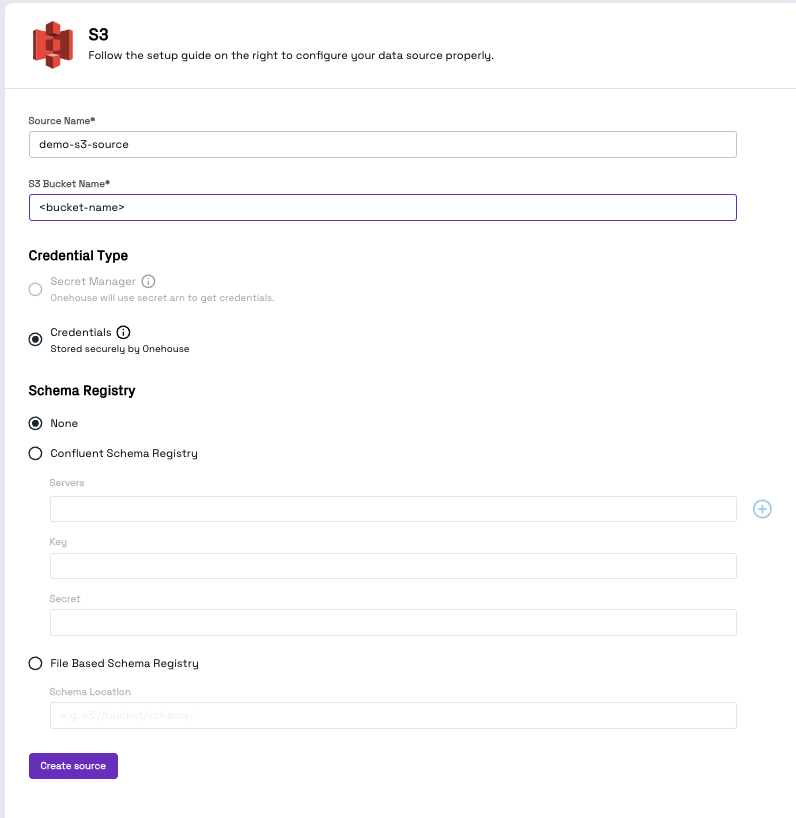
Step 2: Create an S3 source
- Follow the steps provided in the Onehouse docs to create an S3 source
- Provide the source name as demo-s3-source and use the S3 bucket created earlier
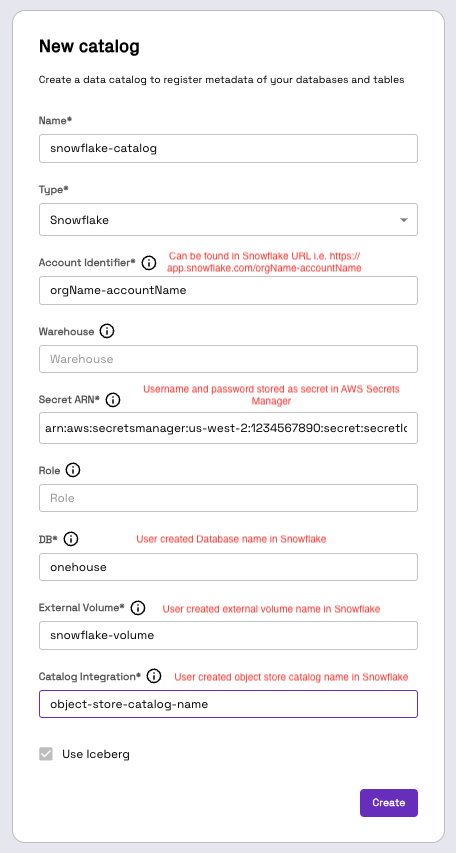
Step 3: Create a Snowflake Catalog
- To create a Snowflake catalog, follow the steps provided in the Onehouse docs
- For better security, we recommend storing the username and password in a secrets manager such as AWS Secrets Manager. This means that the EKS node role needs permission to read the secrets stored in AWS Secrets Manager.
- Follow the steps below to update the node role to have read permissions to the secret:
- In the AWS console, under Elastic Kubernetes Service, choose the cluster provisioned by Onehouse.
- Under the Compute tab, click Node groups.
- Under the Details tab, click the node role under Node IAM role ARN.
- In the IAM console, click Add permissions and click Create inline policy and then choose JSON as Policy editor. Then use the policy below to provide the node role limited access to the secrets stored in AWS Secrets Manager.
{
	"Version": "2012-10-17",
	"Statement": [
		{
			"Sid": "VisualEditor0",
			"Effect": "Allow",
			"Action": [
				"secretsmanager:GetResourcePolicy",
				"secretsmanager:GetSecretValue",
				"secretsmanager:DescribeSecret",
				"secretsmanager:ListSecretVersionIds"
			],
			"Resource": "arn:aws:secretsmanager:<region>::secret:<secret-name>"
		}
	]
}
Step 4: Create a stream capture
- Under Stream Captures, click Add New Stream, and provide an appropriate name such as demo-stream.
- For Pick a data source field, choose the data source created in Step 2.
- For the purposes of this demo, choose Append-only as the Write Mode. For more information on the write mode, please refer to the Onehouse documentation.
- For Bootstrap data, choose Yes.

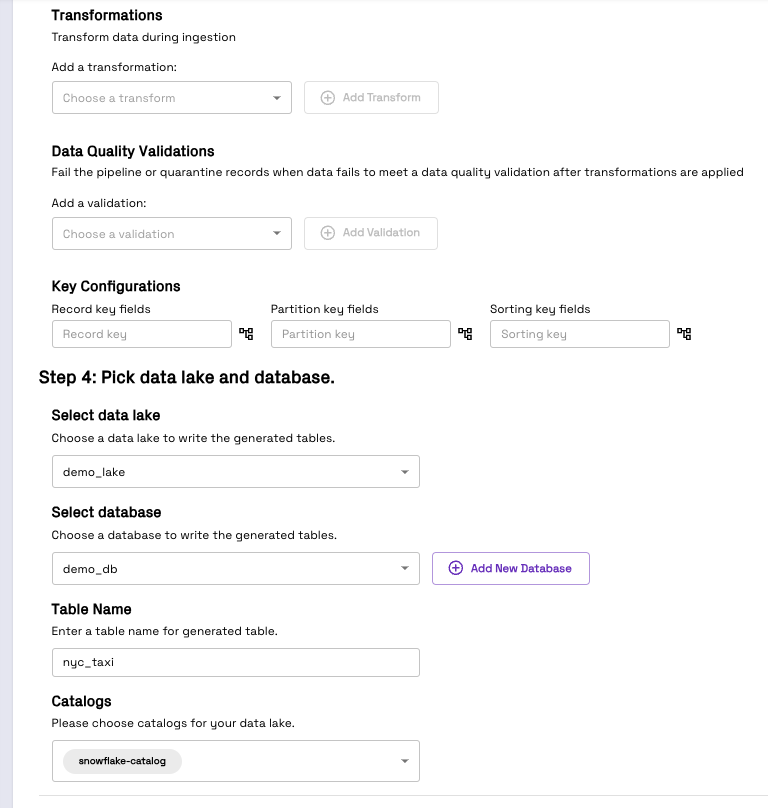
- For Select folder field, enter s3://{bucket-name}/raw_files/
- For the Select file format field, choose PARQUET
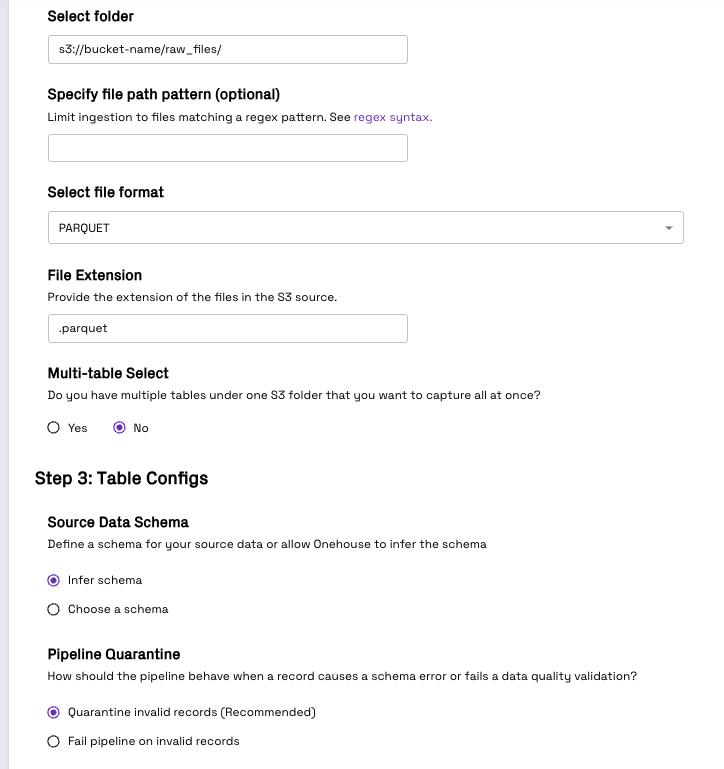
- For Select data lake under Pick data lake and database, choose the Data Lake created in Step 1
- For Select database, choose the database created in Step 1
- For Table Name, provide nyc_taxi
- For Catalogs, choose the catalog created in Step 3
Step 5: Validate the data in the Onehouse Data tab
Once the stream capture is set up and ingesting data from S3, you can validate this data by either using services like S3 Select or Amazon Athena.
Querying from Snowflake
Step 1: Validate the data in Snowflake
After logging into Snowflake, you can view the NYC_TAXI table under DEMO_DB schema under ONEHOUSE database.
You can also run your queries on the table like below. In this example, we are finding the average trip distance and fare amount for each day of the week.
SELECT
    DAYOFWEEK(TPEP_PICKUP_DATETIME) AS day_of_week,
    AVG(TRIP_DISTANCE) AS avg_trip_distance,
    AVG(FARE_AMOUNT) AS avg_fare_amount
FROM nyc_taxi
GROUP BY day_of_week
ORDER BY day_of_week;
Appending more data
Step 1: Add more files to S3
In the S3 console, navigate to s3://{bucket-name}/raw_files/ and upload another sample dataset. This action will trigger Onehouse to process the file and update the database and catalog it with the Snowflake catalog created in Step 3.
Step 2: Read the appended data in Snowflake
As Onehouse processes the data it also triggers ALTER ICEBERG TABLE...REFRESH command in Snowflake which updates the table to keep it in sync with the data and metadata in s3://<bucket_name>/processed_zone/
By running the same SQL query again, you can validate the new average trip distance and fare amount by day of the week.
Conclusion
By leveraging the integration of Onehouse and Snowflake with the help of Apache Iceberg, you can build fast streaming ingestion workloads and use Snowflake for its querying and compute capabilities while maintaining a highly performant and cost-effective architecture.
If you want to learn more about Onehouse and would like to give it a try, please visit the Onehouse listing on the AWS Marketplace or contact gtm@onehouse.ai.
Reference
- Snowflake’s Apache Iceberg support public preview announcement - https://www.snowflake.com/blog/unifying-iceberg-tables/
- NYC Taxi datasets - https://www.nyc.gov/site/tlc/about/tlc-trip-record-data.page
- Onehouse Snowflake integration documentation - https://docs.onehouse.ai/docs/product/ingest-data/stream-captures