Infrastructure Deployment
The Onehouse Infra Deployment follows two steps:
- Onehouse Customer Stack Deployment
- The Onehouse Customer Stack deploys the IAM roles and permissions which allow Onehouse to operate the platform.
- The stack can be deployed using either Terraform or CloudFormation.
- Onehouse Kubernetes Deployment
- The Onehouse Kubernetes Deployment uses the IAM roles provisioned in the Customer Stack to deploy the Onehouse dataplane Kubernetes cluster.
Onehouse Customer Stack Deployment
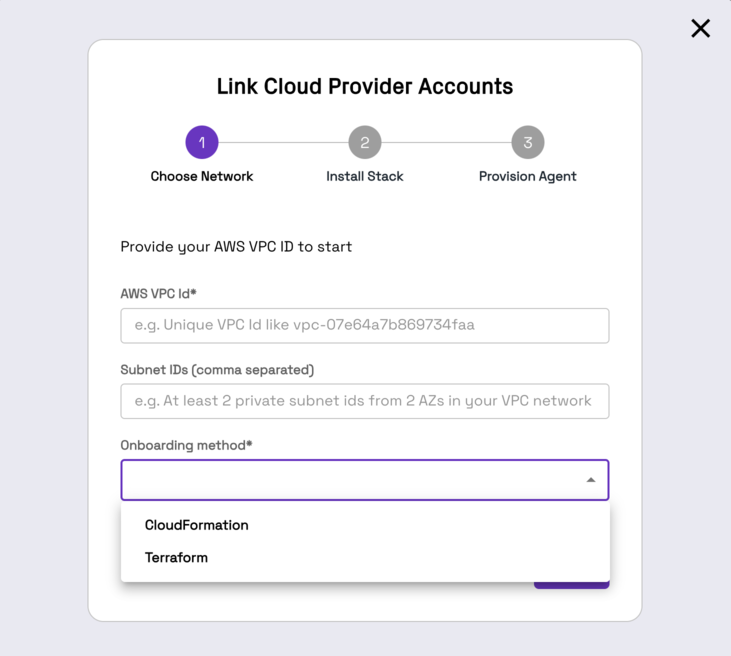
You can use either Terraform or Cloudformation to deploy the Onehouse Customer Stack. Provide your AWS VPC ID, two private subnets within that VPC, and choose your IAC method.
Execute Infrastructure as Code
Details for running the infrastructure as code to deploy the Onehouse Customer Stack for both Terraform and Cloudformation are in the below dropdowns.
Terraform
Prerequisites
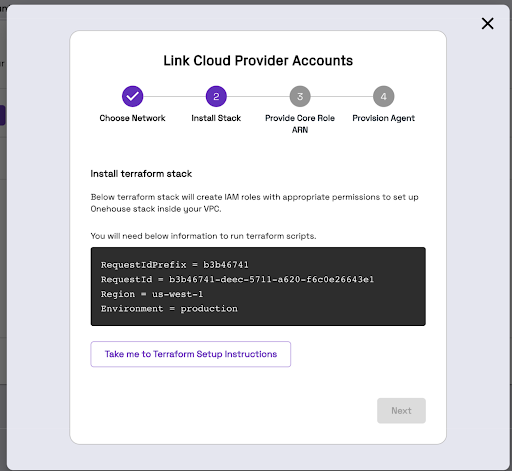
You will need to have the Onehouse customer bucket created before deploying the Onehouse customer stack. This bucket is used by Onehouse to store configs and your terraform details. The bucket needs to be named onehouse-customer-bucket-<RequestIdPrefix>. You can find the RequestIdPrefix in the installation steps below.
Install Terraform Stack
To install the Terraform stack, you will need administrator-like privileges, and you would need to have the token shared by the Onehouse team.
The Terraform script would generate IAM roles and attach policies.
You should see a screen like below.
- Our terraform module is hosted on private registry. To access it, you would need a TF cloud token. You can reach out to your Onehouse POC to get one. Then use that to authenticate with Terraform Cloud.
- You can use the terraform module in your own CI/CD system. Below example shows how you can run this module in Linux or UNIX environment.
- Create a directory with the following structure in a Linux or UNIX environment. You will need to have this environment (either a cloud machine or a local machine) authenticated to your AWS account.:
   my-terraform-project/
   ├── main.tf
   ├── variables.tf
   └── backend.tf
- The template for these files are given below:
backend.tf
In case you wish to store the terraform state in a custom S3 bucket other than the onehouse-customer-bucket-<REQUEST_ID_PREFIX>, please enter the custom S3 bucket name for the bucket field under the backend "s3" section. If you wish to use the same onehouse-customer-bucket-<REQUEST_ID_PREFIX> then update the REQUEST_ID_PREFIX. region needs to be updated mandatorily.
terraform {
   required_version = "1.11.0"
   required_providers {
     aws = {
       version = "5.82.0"
     }
   }
   backend "s3" {
     bucket = "onehouse-customer-bucket-${REQUEST_ID_PREFIX}"
     key    = "onboarding/terraform/preboarding/onehouse.tfstate"
     region = "${REGION}"
   }
}

provider "aws" {
    region = "${REGION}"
}
main.tf
Update the TERRAFORM_MODULE_VERSION
module "customer-stack" {
    source  = "app.terraform.io/Onehouse/customer-stack/aws"
    version = "${TERRAFORM_MODULE_VERSION}"
    # insert required variables here
}

output "core_role_arn" {
  value = module.customer-stack.core_role_arn
}
Detailed release notes for past Terraform module versions can be found here
Creating a bastion host is mandatory to access the cluster. In order to do so, enable the bastionHostConfig flag under ec2Config while passing the parameters and provide the vpcID and privateSubnetID. The details of the ec2Config is provided in the table below.
The variables are explained as below:
| Variable | Description | Default Value |
|---|---|---|
| productFlow | product flow. Possible values: core, lite | core |
| region | [Required] Region of the EKS cluster | |
Eg: region = "us-west-2" | ||
| requestId | Onehouse requestId. Either provide this directly or provide secretArn of the secret containing the requestId. | |
| requestIdSecretManager | Provide the requestId using a secret manager (enabled + secretArn). | enabled = false |
| environment | [Required] Onehouse environment. Possible values: production | |
Eg: environment = "production" | ||
| s3BucketArns | [Required] S3 bucket ARNs to restrict Onehouse access. Bucket ARN Example - arn:aws:s3:::<bucket_name> | |
Eg: s3BucketArns = ["arn:aws:s3:::onehouse-customer-bucket-1a234567", "arn:aws:s3:::onehouse-customer-bucket-2b345678"] | ||
| s3KmsKeys | [Optional] KMS key ARNs for encrypted S3 buckets. Only required when encryption is enabled on S3 buckets | s3KmsKeys = [] : empty list |
| s3DataLoad | Enable s3DataLoad if you want to load existing data (JSON, CSV, Parquet etc.) from S3. If enabled, script asks for permissions to access SNS/SQS. Bucket ARN Example - arn:aws:s3:::<bucket_name>. You can add multiple bucket ARNs | s3DataLoad = { enabled = false } |
To enable: Eg: s3DataLoad = { enabled = true, s3DataSourceBucketArns = ["arn:aws:s3:::bucket_1", "arn:aws:s3:::bucket_2"] } | ||
| mskDataLoad | Enable mskDataLoad if you want to capture data from Amazon Managed Streaming for Apache Kafka (MSK) | mskDataLoad = { enabled = true } |
| databaseDataLoad | Enable databaseDataLoad if you want to load data from databases (postgres, mySQL etc.), data will be streamed via an MSK cluster provisioned in your account. If you are enabling this flag, make sure to enable mskDataLoad as well. | databaseDataLoad = { enabled = true } |
| glueSync | Enable glueSync if you want to sync to AWS Glue | glueSync = { enabled = true} |
| secretsManagerConfig | Specifies the permissions to secrets/secrets-manager in the cloud account for connecting to datasources and external entities. | |
| Supported values: | ||
| - "OMS": [DEFAULT] Onehouse managed secrets. Users input credentials (username/password, API keys, etc.) via the Onehouse UI or API. Credentials are stored in the Onehouse management layer outside the customer cloud account. Users can update credentials or rotate keys using supported edit flows in the Onehouse UI. | ||
| - "BYOS": [RECOMMENDED] Bring your own secret. Users create, update, and delete secrets in the Secrets Manager in their customer cloud account. The secret must have the tag "accessibleTo" set to "onehouse". Secrets for different resources must be stored in a predefined JSON format as defined in Onehouse documentation. The eks_node_role will be granted read permissions to secrets tagged with "accessibleTo" set to "onehouse". | ||
| ascp | Enable mounting Onehouse secrets directly from AWS Secrets Manager | ascp = { enabled = false } |
| aclSync | Enable aclSync if you want to sync ACL settings across multiple meta-stores via onehouse. If this option is enabled, lakeformation data-lake settings will be updated. Please check the terraform output to "module.acl_node_role_access_policy[0].null_resource.add_node_role_to_datalake_admin" to view the existing settings. | aclSync = { enabled = false } |
| lockProviderConfig | Specifies the permissions to DynamoDB table for using it as lock for observed data lake tables. | lockProviderConfig = { enableDynamoDB = true } |
Usage: lockProviderConfig = { enableDynamoDB = true } | ||
| ec2Config | Configuration for EC2 access/diagnostics. All options (bastion host, diagnostic host, and private link) must always be enabled. Need to provide the same VPC ID and private subnet ID as your EKS cluster. | ec2Config = { vpcID = "${vpcId}", privateSubnetID = "${privatesubnetID}", privateLink = { enabled = true, privateLinkSubnets = ["${privateSubnetID1}", "${privateSubnetID1}", . . .] }} |
| Need to provide vpcId and privateSubnetIds. They are mandatory for bastion provisioning. | ||
| integrations | Create an AWS Secret named onehouse-datadog-api-key with the tag accessibleTo=onehouse, and store the Datadog API key in it. | integrations = { enableDatadog = false, enableGuardduty = false } |
| karpenterSupport | Enable Karpenter support | karpenterSupport = { enabled = true } |
| customerRoleArns | [Optional] customer role to access EKS clusters | [] |
| customAmiSupport | Enable custom api support | customAmiSupport = { createEbsKmsKeyArn = true, ebsKmsKeyArn = "" } |
| s3SupportBucketArns | S3 bucket paths onehouse support team can read | [] |
- Create a S3 bucket to hold Terraform artifacts:
onehouse-customer-bucket-<RequestIdPrefix>. RequestIdPrefix is provided as one of the input parameters in order for Terraform to initialize a working directory, configure the backend, download the providers etc.
Note: Do not manually update the number of nodes in your Kubernetes cluster. Onehouse will automate this for you. Modifying the stack may prevent Onehouse from functioning properly.
Migrating Existing Terraform Stack into using Private Registry Modules
In case you already have a terraform stack and all the resources have already been created, the only step which has to be executed is to migrate the Terraform Modules to use the new name.
Purposefully, the line terraform state mv has been commented below. First you can run the script which will print all your modules are correctly getting moved. Post that, you can uncomment the line and move all your terraform resources.
#!/usr/bin/env bash
set -euo pipefail

if [ $# -ne 1 ]; then
  echo "Usage: $0 <wrapper_module_name>"
  exit 1
fi

WRAPPER=$1

terraform state list | grep -v '^data\.' | while read -r resource; do
  # Prepend module.<WRAPPER>. to everything
  new_resource="module.${WRAPPER}.${resource}"
  echo "Moving: $resource -> $new_resource"
  #terraform state mv "$resource" "$new_resource"
done
Run Terraform Stack
Follow the steps below:
terraform init --reconfigure
terraform plan
terraform apply
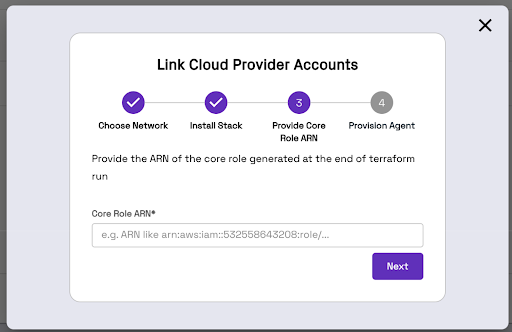
Terraform will generate an IAM Role ARN. Copy/Paste this ARN into the Onehouse UI.
CHANGELOG
Recent Changes to terraform module are available here Release Notes.
Cloudformation
Install Cloudformation Stack
Click on "Take me to AWS Cloudformation" and then fill out the Parameters section of the Cloudformation UI according to your needs. WARNING: Do not change the name of the Cloudformation Stack. We use the defined name to monitor the onboarding process.
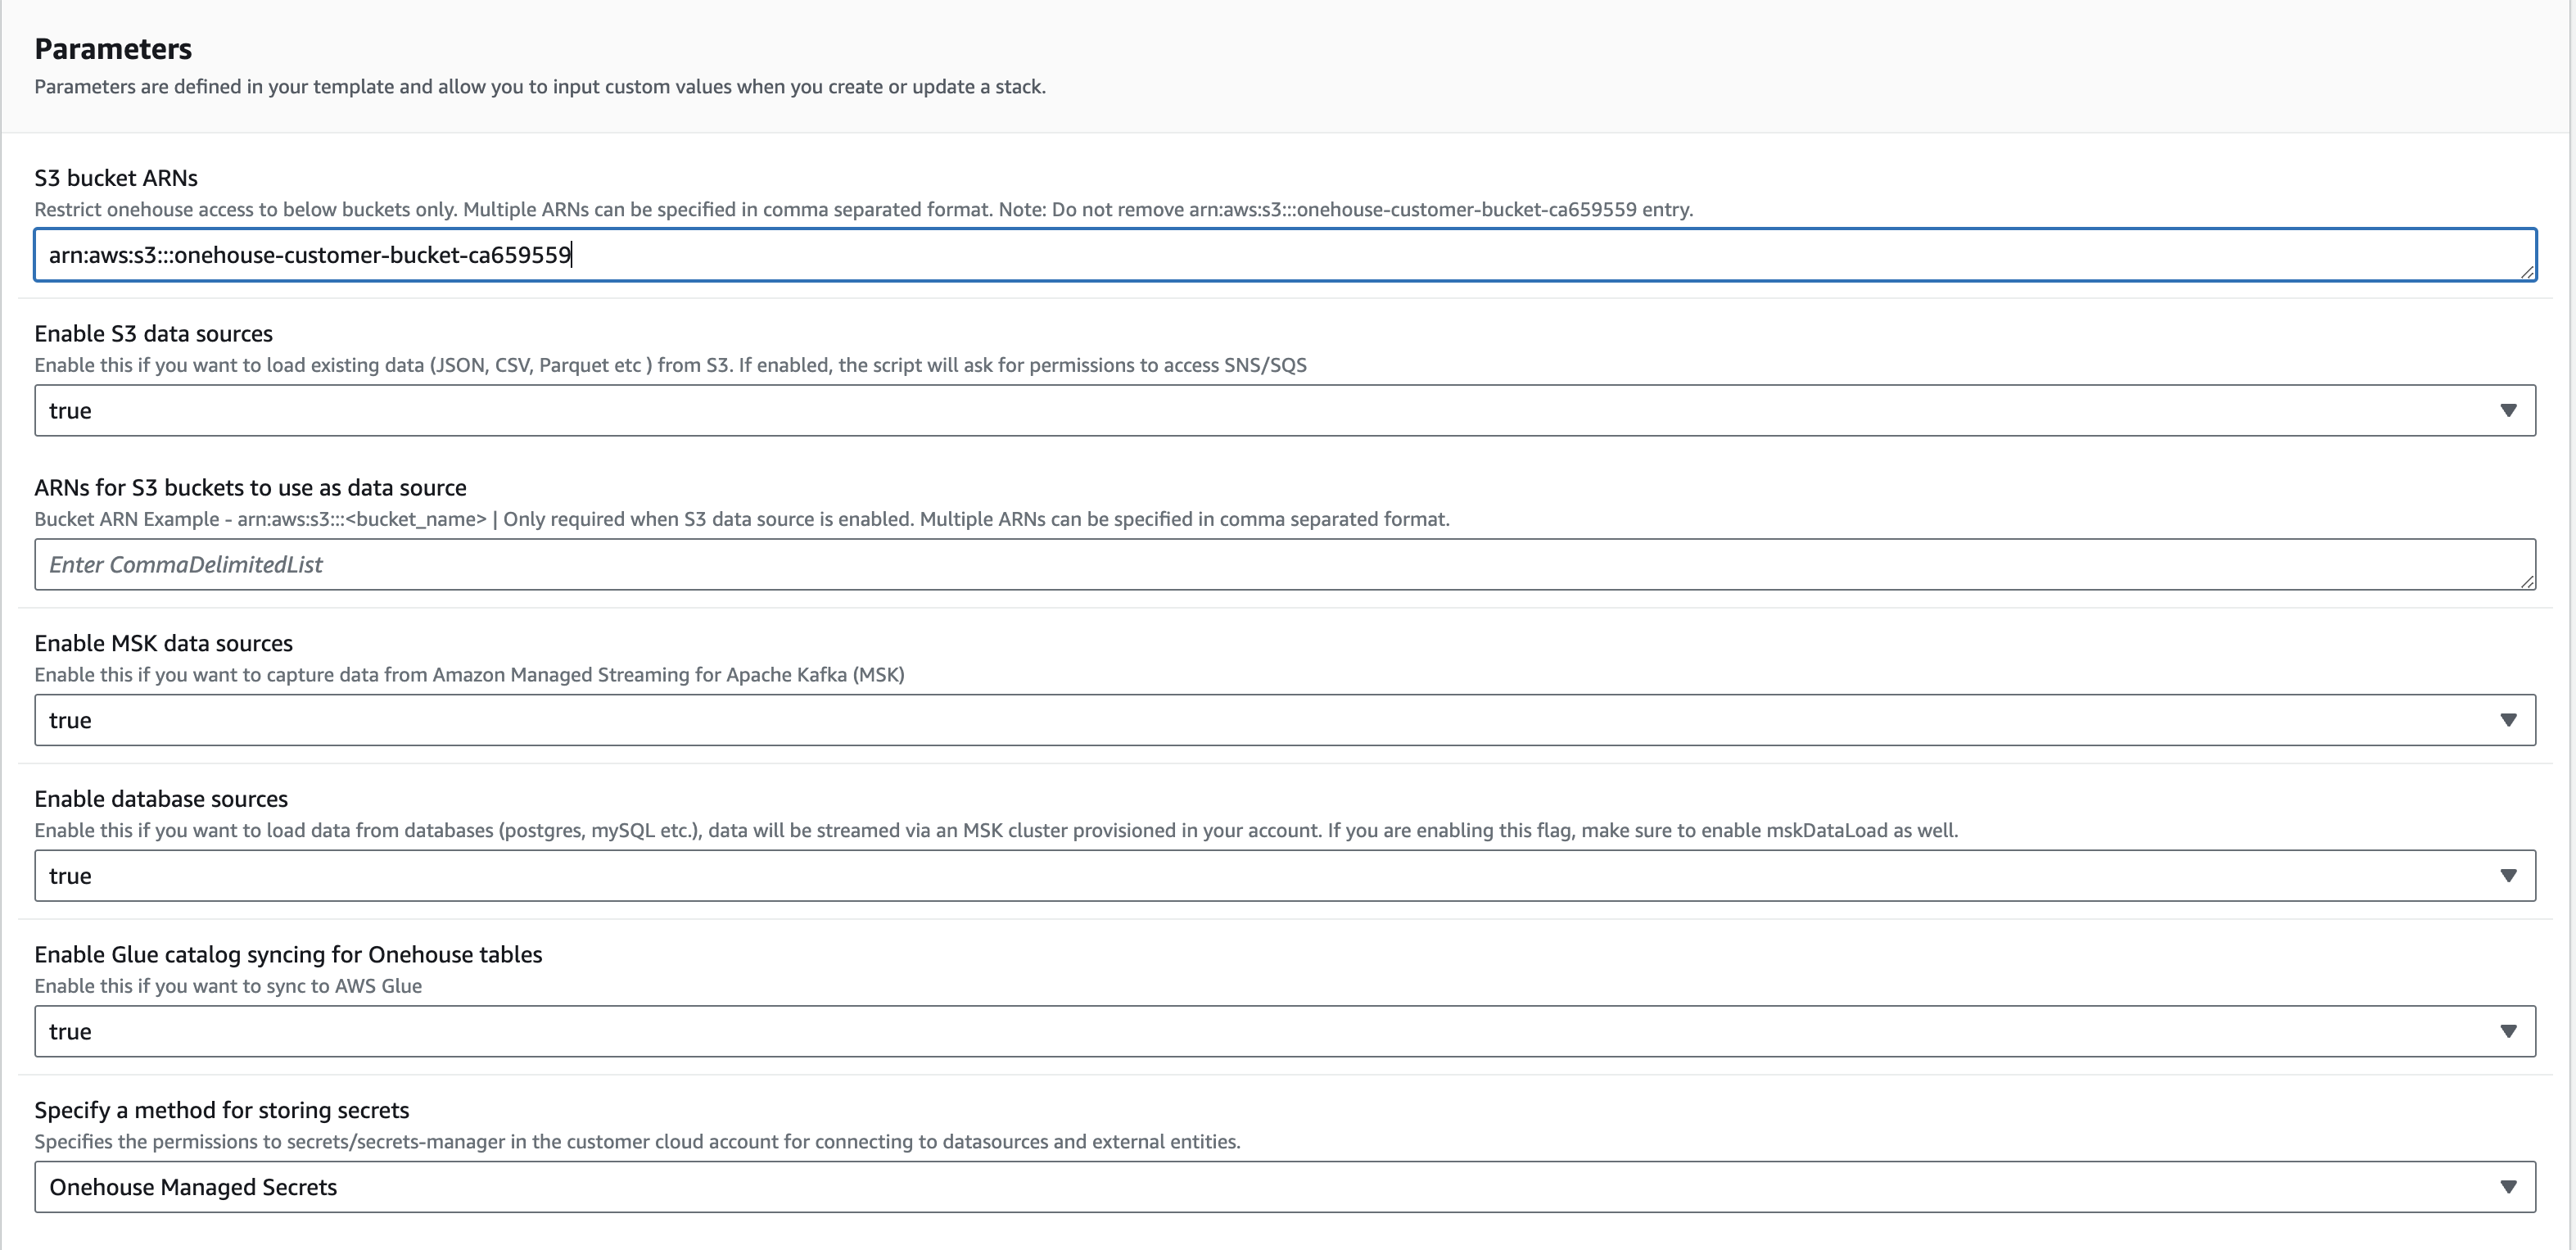
Click on Create Stack for Cloudformation to create all the needed resources. Once the stack is created, go back to the Onehouse UI and click on Next for the Onehouse Lakehouse resources to be deployed.
Kubernetes Deployment
The Onehouse Data Plane Kubernetes cluster creation will start automatically. Once finished, the wizard will close and you will see 1 entry in the Connections > Cloud Accounts page.
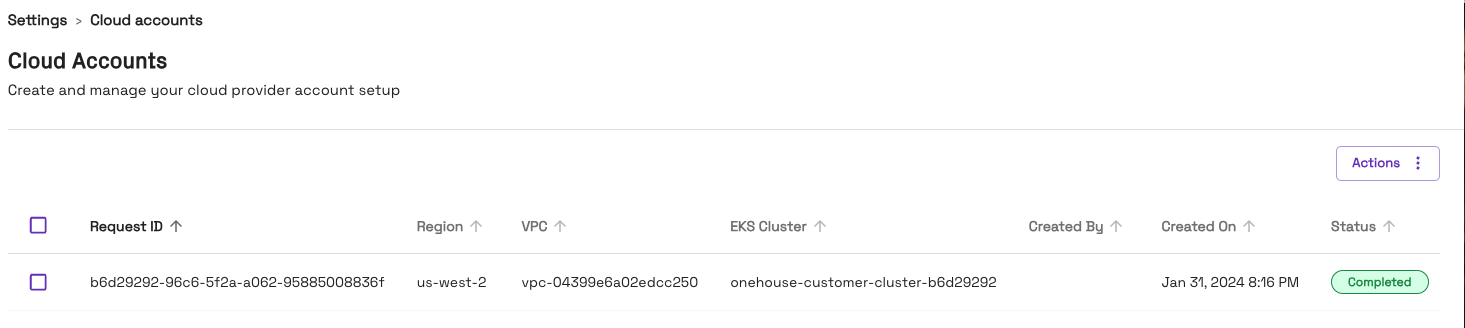
Please do not close the page while the provisioning is in progress. This step will take up to ~30-40 mins to finish. If it fails, please reach out to your Onehouse team for help.